Few things are more frustrating on a hot day than an electric fan that can’t hold its position, leaving you to constantly readjust a drooping fan head. Instead of delivering a refreshing breeze where you need it most, your fan might be stubbornly pointing at the floor or ceiling, making it virtually useless. This common issue plagues many fan owners, turning a simple comfort appliance into a source of annoyance. But before you consider replacing your trusty electric fan, know that this problem is often a simple fix that you can tackle yourself with minimal tools and effort. This guide will walk you through the process, empowering you to restore your fan’s functionality and enjoy uninterrupted cooling once again.
Electric Fan Head Drooping: Understanding the Problem
The ability of an electric fan to tilt and stay in a specific position is crucial for effective air circulation. This function relies on a tilt mechanism, typically found on either side of the fan head where it connects to the stand or base. Over time, or with frequent adjustments, the components within this mechanism can wear out or loosen, leading to the dreaded “drooping” fan head.
The primary culprits behind a fan head that refuses to stay up are usually loose screws, nuts, or worn plastic washers within the pivot points. Constant movement and the natural vibrations of the fan can cause these fasteners to gradually become less secure. In some cases, the plastic components designed to provide friction might degrade, losing their grip and allowing the fan head to sag under its own weight. Understanding these common causes is the first step toward a successful repair, as it directs your attention to the specific areas that require adjustment or minor replacement.
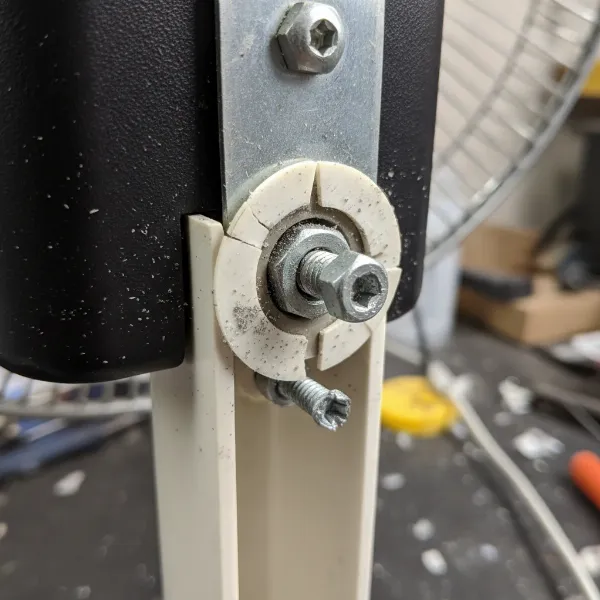 Close-up of a fan's tilt mechanism showing loose screws and worn plastic washers
Step-by-Step Guide to Fixing Your Fan Head’s Tilt Mechanism
Bringing your fan back to full functionality is often a straightforward task. Here’s a detailed guide to help you get started.
Safety First: Unplugging Your Fan
|
Our Picks for the Best Electric fan in 2026
As an Amazon Associate I earn from qualifying purchases.
|
||
| Num | Product | Action |
|---|---|---|
| 1 | Lasko 2520 Oscillating Stand Fan,White 16 Inch |

|
| 2 | Amazon Basics 16" Pedestal Fan with Remote, Floor Fan, Standing Fan for Bedroom, Living Room, Office, with 3 Speeds, 3 Modes, Timer, Dual-Layered Blades, Adjustable Height, Tilt Head, 60W, Black |
|
| 3 | Amazon Basics Air Circulator Fan, Desk Fan for Bedroom, Home and Office, With 90-Degree Tilt Head, 3 Speed Settings, Lightweight (3 LBS), 35 Watts, Black, 11.1"W x 6.3"D x 10.9"H |
|
| 4 | Viniper Portable Rechargeable Fan, Small Desk Fan : 3 Speeds & about 8-24 Hours Longer Working, 180 Rotation, Portable Desktop Fan Small but Mighty, Strong Wind (White, Light Black Blade)6.2 Inch |
|
| 5 | Dreo Tower Fan for Bedroom, 25ft/s Velocity Quiet Floor Fan, 90° Oscillating Fans for Indoors with 4 Speeds, 4 Modes, 8H Timer, Standing Fans, Bladeless Fan, Black, Nomad One (DR-HTF007) |
|
| 6 | LEVOIT Tower Fan for Bedroom, 25ft/s Velocity Standing Fan with 28dB Quiet for Sleep, Remoter, 12H Timer, 5 Speeds, 4 Modes, 90° Oscillation for Home, Office, Indoor, Bladeless 36 inch, White |
|
| 7 | Dreo Fan for Bedroom, 120° Oscillating Standing Fans, Quiet Floor Fan with DC Motor, 100ft Pedestal Fans for Room, 9 Speeds, 4 modes, 20dB, 120° Manual Vertical, 37-42" Adjustable Height, 9H Timer |
|
| 8 | XPOWER FC-100S Multipurpose 11 Pro Air Circulator Utility Fan with Oscillating Feature |
|
| 9 | 10" Modern Standing Fan for Bedroom, Sleek Oscillating Pedestal Fan, 3-Speed & Height Adjustable Compact Floor Fan for Home Office & Dorm |
|
| 10 | Dreo Fan for Bedroom, 120° Oscillating Standing Fan, Quiet Floor Fan with DC Motor, Pedestal Fan for Room, 9 Speeds, 4 modes, 20dB, 120° Manual Vertical, 37-42" Adjustable Height, 9H Timer, Black |
|
Before attempting any repair on an electric fan, or any electrical appliance for that matter, safety must be your absolute priority. Always ensure the fan is completely unplugged from the power outlet. This simple but critical step eliminates the risk of electrical shock and allows you to work on the fan safely and confidently. Never proceed with disassembly or adjustments while the fan is still connected to power.
Accessing the Tilt Mechanism
The tilt mechanism is usually located on the sides of the fan head, where it pivots on its support. Most fan designs incorporate decorative caps or covers over the nuts and screws that secure the head’s angle. To access these fasteners, you’ll need to carefully remove these caps.
- Locate the caps: Look for small, often circular or oval, plastic covers on the left and right sides of the fan head, directly at the pivot points.
- Gentle removal: Use a small, flat-head screwdriver or a pen knife to carefully pry off these caps. Insert the tip into a seam or a small notch and gently twist or lift. Be patient and apply even pressure to avoid scratching the fan’s plastic housing or breaking the caps. They are typically designed to pop off without too much force.
Identifying the Fasteners
Once the decorative caps are removed, you will expose the core of the tilt mechanism. This usually consists of a screw and a corresponding nut (or sometimes just a tension screw that threads directly into the plastic).
- Observe the fasteners: You’ll likely see a Phillips-head or flat-head screw on one side, and a nut on the other, or a combination designed to create tension. Some fans might have a large, hand-tightenable knob that secures the tilt.
- Understand the function: These fasteners are designed to apply pressure to the pivot points, creating enough friction to hold the fan head in place at various angles. When they loosen, the friction diminishes, and the head droops.
Tightening the Mechanism
With the fasteners exposed, you can now begin the actual repair. The goal is to tighten these components just enough to restore adequate friction without overtightening, which could strip the threads or crack plastic parts.
- Use the right tool: For screws, use a screwdriver that fits snugly into the screw head (Phillips or flat-head). For nuts, you may need a small wrench or pliers.
- Gradual tightening: Turn the screw clockwise (or tighten the nut) slowly. After a quarter-turn, test the fan head’s ability to stay up.
- Test and adjust: Gently tilt the fan head to your desired angle. Does it hold? If not, tighten a little more. Repeat this process until the fan head holds its position firmly without drooping, but can still be adjusted with reasonable effort.
- Avoid overtightening: Excessive force can damage the plastic housing, strip the threads, or make future adjustments difficult. The goal is firm, not rigid.
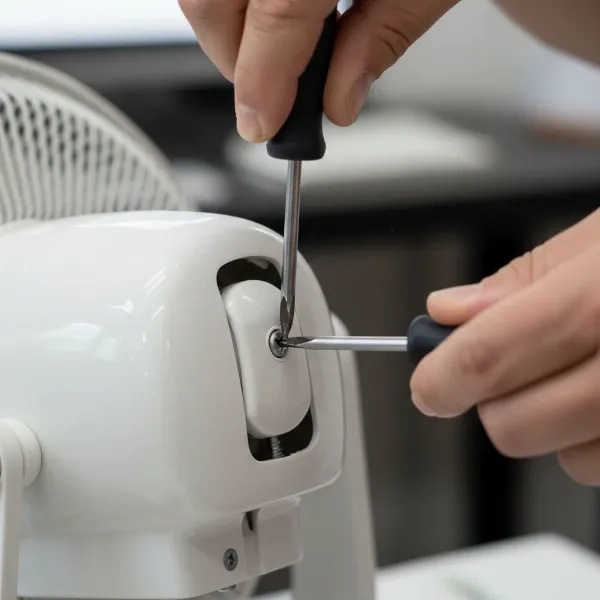 Hand using a screwdriver to tighten the screw on an electric fan's tilt mechanism
Reassembly
Once you’ve confirmed that the fan head now stays in place, it’s time to put everything back together.
- Replace the caps: Align the decorative caps with their respective openings and gently press them back into place until they snap securely.
- Final check: Give the fan head a few tilts to ensure the mechanism is holding and that all parts are secure.
When Simple Tightening Isn’t Enough: Advanced Troubleshooting
While a simple tightening often resolves the issue, sometimes the problem lies deeper than just loose fasteners.
Worn-Out Parts Inspection
If tightening the screw and nut doesn’t solve the problem, or if the mechanism quickly loosens again, inspect the internal components for wear.
- Plastic washers or bushings: Many tilt mechanisms use plastic washers or bushings between the moving parts to provide smooth friction. Over time, these can become flattened, cracked, or worn, reducing their ability to create the necessary tension.
- Solutions:
- Adding rubber washers: You can often introduce thin rubber washers or O-rings of the appropriate size between the existing components to add extra friction and take up slack.
- Replacing parts: If a specific plastic piece is broken or severely worn, you might be able to find replacement parts from the manufacturer or through online appliance parts retailers. Generic parts might also work if they fit correctly.
Considering Replacement Parts
When plastic components are significantly damaged or the internal mechanism is beyond simple repair, replacement parts become a viable option. This is particularly true for higher-quality or more expensive fans where replacing a small component is more economical and environmentally friendly than buying an entirely new unit.
- Identify the specific part: Consult your fan’s manual or search online for diagrams to identify the exact part needed (e.g., “fan tilt knob replacement,” “pivot joint bushing”).
- Source parts: Check the manufacturer’s website, authorized service centers, or general appliance parts websites.
Preventing Future Fan Head Drooping
A little proactive care can go a long way in prolonging the life of your fan’s tilt mechanism.
Proper Handling and Adjustment
The way you interact with your fan directly impacts its longevity.
- Gentle adjustments: Avoid forcefully jerking the fan head into position. Instead, gently guide it to the desired angle.
- Minimize unnecessary movement: Once set, try to keep adjustments to a minimum. Constant, vigorous repositioning can accelerate wear on the tilt mechanism’s components.
Regular Maintenance Checks
Incorporating quick checks into your routine can help catch minor issues before they become major problems.
- Periodically check fasteners: Every few months, or if you notice slight loosening, perform a quick check of the tilt mechanism’s screws or knobs. A small turn of a screwdriver or tightening of a knob can prevent the head from completely drooping.
- Keep clean: While not directly related to tilt, keeping the fan clean prevents debris from interfering with moving parts.
Choosing Durable Electric Fans
When purchasing a new fan, consider designs known for their robust construction, especially in critical areas like the tilt mechanism.
- Look for metal components: Fans with metal pivot points, screws, and nuts tend to offer greater durability and resistance to wear compared to all-plastic assemblies.
- Read reviews: Check user reviews for comments on the fan’s build quality, particularly concerning how well it holds its position over time. Investing a little more upfront in a well-built electric fan can save you repair headaches down the line.
Expert Advice: When to Repair vs. Replace Your Electric Fan
Deciding whether to repair a drooping fan head or invest in a new electric fan often comes down to a few key considerations. If the fix is as simple as tightening a screw or replacing an easily accessible, inexpensive part, repairing is almost always the more cost-effective and environmentally conscious choice. It extends the life of your appliance and reduces waste. However, if the main motor is failing, multiple critical components are broken, or the cost of replacement parts approaches that of a new fan, then replacement might be the more practical solution. Always prioritize safety; if a fan has exposed wiring or structural damage that could pose an electrical hazard, it’s time to retire it.
Conclusion
A drooping fan head can quickly diminish the comfort and effectiveness of your electric fan, turning a simple cooling solution into a constant frustration. However, as we’ve explored, this common issue is often easily remedied with a bit of DIY spirit. By understanding the underlying causes—typically loose fasteners or worn components—and following a few straightforward steps to access and tighten the tilt mechanism, you can quickly restore your fan’s ability to hold its position. Regular maintenance and gentle handling can further extend your fan’s life, ensuring it continues to provide a refreshing breeze where you need it most. Don’t let a wobbly head get you down; take a moment to give your electric fan the simple fix it deserves. What other fan frustrations have you successfully tackled at home?
Frequently Asked Questions
Why does my electric fan head keep falling?
A fan head typically falls because the pivot mechanism, which allows it to tilt, has become loose. This is often due to screws or nuts that have vibrated loose over time, or plastic components within the tilt joint that have worn down, reducing the friction needed to hold the fan head in place.
What tools do I need to fix a drooping fan head?
Most fan head repairs require only basic tools. You will likely need a small flat-head screwdriver or a pen knife to remove decorative caps, and then a Phillips-head screwdriver, a small wrench, or pliers to tighten the exposed nuts and screws within the tilt mechanism.
Can I use glue to fix a loose fan head?
It is generally not recommended to use glue to fix a loose fan head. While it might provide a temporary hold, it will prevent future adjustments of the fan head’s angle and can make any subsequent repairs much more difficult. It’s better to tighten existing fasteners or replace worn components.
Is it safe to repair my electric fan myself?
Repairing an electric fan can be safe if you follow proper precautions. Always unplug the fan before starting any work to eliminate the risk of electrical shock. If you are uncomfortable with the repair or if it involves complex electrical components, it’s best to consult a professional or consider replacing the fan.
How often should I check my fan’s tilt mechanism?
There’s no strict schedule for checking your fan’s tilt mechanism. A good practice is to periodically check it whenever you clean your fan or if you notice the head starting to feel less secure. A quick check and minor tightening can prevent the problem from worsening and extend the life of your electric fan.