Few things are as frustrating as switching on your electric fan, only to be met with a persistent hum and motionless blades. That familiar buzzing sound indicates that power is reaching the motor, but for some reason, the rotation isn’t happening. As someone who has spent over a decade dissecting and repairing these essential cooling devices, I can tell you that this is a common issue, and thankfully, often a fixable one. Instead of tossing your fan aside, let’s dive into the common culprits behind this problem and how you can troubleshoot and repair it yourself, saving both money and keeping perfectly good appliances out of the landfill.
Understanding the Hum: Why Your Electric Fan Stops Spinning
When your electric fan hums but refuses to spin, it’s a clear signal that the motor is receiving electrical current, but something is preventing it from completing its mechanical duty – rotating the fan blades. This phenomenon typically points to one of two primary issues: either a mechanical obstruction or seizure preventing movement, or an electrical component failing to provide the necessary “kickstart” to the motor. Understanding which category your problem falls into is the first step toward a successful repair. Many types of electric fans, from pedestal and table fans to box fans and even some ceiling fans, can experience this issue, and the diagnostic steps are largely similar.
 An exploded view of an electric fan motor highlighting potential failure points.
Essential Tools and Safety Precautions
Before you begin any work on an electric fan, safety must be your top priority. You’ll be dealing with electricity and moving parts, so taking the necessary precautions is crucial to prevent injury.
Here’s what you’ll typically need:
- Screwdriver set: Phillips and flathead, to open the fan housing.
- Lubricant: Light machine oil (like 3-in-1 oil) or a silicone-based spray. Avoid heavy grease. WD-40 can be used initially to loosen seized parts, but follow up with a proper lubricant for lasting effect.
- Pliers: For gripping small components or wires.
- Wire cutters/strippers: If a capacitor replacement is needed.
- Multimeter (optional but recommended): For testing the capacitor or motor windings.
- Soft cloths/brushes: For cleaning dust and debris.
- Safety gloves: To protect your hands.
Prioritizing Safety During Electric Fan Repair
Always remember these golden rules:
- Unplug the Fan: Before touching any internal components, always disconnect the fan from the power outlet. Even if the fan isn’t spinning, it’s still connected to live electricity.
- Discharge Capacitors: If you’re working with a fan that has a capacitor, be aware that it can store an electrical charge even after unplugged. Use a screwdriver with an insulated handle to short the terminals of the capacitor before handling it directly.
- Work in a Well-Lit Area: Ensure you have clear visibility of all components.
- Don’t Rush: Take your time with each step, especially when disassembling or reassembling.
|
Our Picks for the Best Electric fan in 2026
As an Amazon Associate I earn from qualifying purchases.
|
||
| Num | Product | Action |
|---|---|---|
| 1 | Dreo Tower Fan for Bedroom, 25ft/s Velocity Quiet Floor Fan, 90° Oscillating Fans for Indoors with 4 Speeds, 4 Modes, 8H Timer, Standing Fans, Bladeless Fan, Black, Nomad One (DR-HTF007) |

|
| 2 | Dreo Fan for Bedroom, 120° Oscillating Standing Fan, Quiet Floor Fan with DC Motor, Pedestal Fan for Room, 9 Speeds, 4 modes, 20dB, 120° Manual Vertical, 37-42" Adjustable Height, 9H Timer, Black |
|
| 3 | Viniper Portable Rechargeable Fan, Small Desk Fan : 3 Speeds & about 8-24 Hours Longer Working, 180 Rotation, Portable Desktop Fan Small but Mighty, Strong Wind (White, Light Black Blade)6.2 Inch |
|
| 4 | 10" Modern Standing Fan for Bedroom, Sleek Oscillating Pedestal Fan, 3-Speed & Height Adjustable Compact Floor Fan for Home Office & Dorm |
|
| 5 | Lasko 2520 Oscillating Stand Fan,White 16 Inch |
|
| 6 | Dreo Fan for Bedroom, 120° Oscillating Standing Fans, Quiet Floor Fan with DC Motor, 100ft Pedestal Fans for Room, 9 Speeds, 4 modes, 20dB, 120° Manual Vertical, 37-42" Adjustable Height, 9H Timer |
|
| 7 | Amazon Basics 16" Pedestal Fan with Remote, Floor Fan, Standing Fan for Bedroom, Living Room, Office, with 3 Speeds, 3 Modes, Timer, Dual-Layered Blades, Adjustable Height, Tilt Head, 60W, Black |
|
| 8 | LEVOIT Tower Fan for Bedroom, 25ft/s Velocity Standing Fan with 28dB Quiet for Sleep, Remoter, 12H Timer, 5 Speeds, 4 Modes, 90° Oscillation for Home, Office, Indoor, Bladeless 36 inch, White |
|
| 9 | Amazon Basics Air Circulator Fan, Desk Fan for Bedroom, Home and Office, With 90-Degree Tilt Head, 3 Speed Settings, Lightweight (3 LBS), 35 Watts, Black, 11.1"W x 6.3"D x 10.9"H |
|
| 10 | XPOWER FC-100S Multipurpose 11 Pro Air Circulator Utility Fan with Oscillating Feature |
|
Diagnosing the Problem: Step-by-Step Troubleshooting
Pinpointing the exact cause of a humming, non-spinning fan often involves a systematic approach. By following these steps, you can usually narrow down the possibilities.
The Manual Spin Test: Identifying Mechanical vs. Electrical Issues
This simple test is highly effective for a quick initial diagnosis.
- Ensure Safety: Unplug the fan from the power outlet.
- Access Blades: Gently remove the front grille of your fan to expose the blades.
- Attempt Manual Spin: Try to spin the fan blades by hand.
- If the blades are stiff, hard to turn, or don’t spin freely: This strongly suggests a mechanical issue. The motor bearings might be seized, or there could be a physical obstruction.
- If the blades spin freely and smoothly: This points towards an electrical issue, most commonly a faulty start capacitor. The motor itself is physically capable of turning, but it’s not getting the initial power surge it needs to begin.
Visual Inspection: Uncovering Obvious Obstructions and Damage
Once you’ve performed the manual spin test, a thorough visual inspection can reveal many common problems.
- Unplug the Fan: Reiterate safety first.
- Disassemble: Carefully remove the fan grille and blades. You might need to remove screws or pop open clips. Some fans require further disassembly to access the motor housing.
- Check for Obstructions: Look closely around the motor shaft, behind the blades, and inside the motor housing. Common culprits include:
- Dust and Dirt Buildup: Years of accumulated dust can create a thick, felt-like layer that seizes the motor shaft or bearings.
- Hair and Pet Fur: These can wrap tightly around the motor shaft, creating significant friction.
- Small Debris: Anything from a loose screw to a small toy part can become lodged, preventing movement.
- Inspect Wiring: While you have the fan open, check for any loose, frayed, or disconnected wires. Ensure all connections are secure.
- Examine Capacitor: Locate the capacitor, often a cylindrical component attached to the motor. Look for any signs of physical damage, such as bulging, leaking, or burn marks. A damaged capacitor is a strong indicator of failure.
Common Causes and Their Solutions
Based on your diagnostic steps, here are the most frequent reasons why an electric fan hums but won’t spin, along with solutions.
Seized Motor Bearings or Shaft
This is a very common mechanical issue, especially in older fans. Over time, the lubricant within the motor bearings can dry out, or dust and grime can accumulate, causing the shaft to seize.
- Problem: The motor tries to turn (hence the hum), but the blades cannot overcome the friction from the seized bearings or a stiff shaft. You’ll usually notice this if the blades are stiff during the manual spin test.
- Solution: Cleaning and Lubrication
- Disassemble: Fully disassemble the fan until you can access the motor shaft and bearings. This might involve removing the rear motor housing cover.
- Clean Thoroughly: Use a brush, compressed air, or a dry cloth to remove all dust, dirt, and solidified old lubricant from the motor shaft and around the bearings. Pay close attention to any hair or fibers wrapped around the shaft.
- Apply Lubricant: Apply a few drops of light machine oil (like 3-in-1 oil) directly to the front and rear motor bearings. Spin the shaft manually to help the oil penetrate. For severely seized bearings, you might initially use a penetrating oil like WD-40, then follow up with machine oil after it has loosened.
- Work the Lubricant In: Continue spinning the shaft by hand until it moves freely and smoothly. It might take a few minutes for the lubricant to work its way into the bearings.
- Reassemble and Test: Once the shaft spins freely, reassemble your fan and test it.
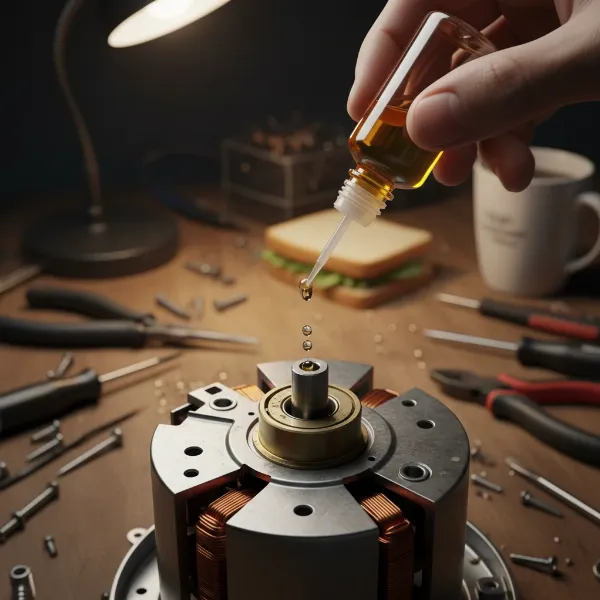 Hand lubricating an electric fan's motor shaft bearings with oil.
Faulty Start Capacitor
The start capacitor provides an initial burst of electricity to the motor, giving it the torque needed to start spinning. If it’s weak or dead, the motor will hum as it receives power, but it won’t have enough force to initiate rotation. This is the likely culprit if your fan blades spin freely by hand but won’t start on their own. Capacitors typically have a lifespan of 5-6 years before they start to weaken.
- Problem: The motor receives continuous current but lacks the initial “kick” to overcome inertia.
- Solution: Testing and Replacing the Capacitor
- Safety First: Unplug the fan and discharge the capacitor if accessible.
- Locate the Capacitor: It’s usually a small, cylindrical or rectangular component, often located within the motor housing or control panel.
- Note Specifications: Before disconnecting, note the capacitor’s microfarad (µF) rating and voltage. A replacement must match these specifications exactly. Take a photo of the wiring for reference.
- Disconnect: Carefully cut or unclip the wires connecting the old capacitor.
- Test (Optional): If you have a multimeter with a capacitance setting, you can test the old capacitor to confirm it’s faulty. However, if it’s visually damaged or if other fixes haven’t worked and the blades spin freely, replacement is a good next step.
- Install New Capacitor: Connect the new capacitor, ensuring the wires are reconnected exactly as they were on the old one. If there are multiple wires of different colors, follow the original configuration carefully. Use wire nuts and electrical tape if needed for secure connections.
- Secure and Reassemble: Tuck the new capacitor securely within the housing, ensuring no wires interfere with moving parts. Reassemble the fan and test.
Obstructions (Hair, Debris)
Sometimes the simplest explanation is the correct one. Accumulation of foreign material around the motor shaft or blades can physically impede rotation.
- Problem: Hair, pet fur, dust bunnies, or other small objects get tangled around the fan blade shaft or lodge between the blades and the grille.
- Solution: Thorough Cleaning
- Unplug and Disassemble: Disconnect power and remove the front grille and fan blades.
- Clear Debris: Carefully remove all visible hair, dust, and debris from the blades, the motor shaft, and the surrounding areas. Use tweezers or a small pick for stubborn tangles.
- Clean Blades and Grilles: Wipe down the blades and grilles with a damp cloth to remove any sticky residue that might attract more dust.
- Reassemble and Test: Put the fan back together and see if it spins. Often, this is all it takes.
Electrical Wiring Issues or Faulty Switch
While less common for a fan that hums (as humming implies power is reaching the motor), internal wiring issues or a faulty speed switch can sometimes prevent full rotation.
- Problem: Loose connections, damaged internal wiring, or a malfunctioning speed switch might send an incomplete or insufficient signal to the motor.
- Solution: Checking Connections (and Professional Help)
- Unplug the Fan: Safety first.
- Inspect Visible Wiring: Check for any obvious loose or corroded connections. Gently tighten any terminal screws.
- Examine Speed Switch: If you’re comfortable and have a multimeter, you can test the continuity of the speed switch in its various positions. A faulty switch might not be allowing full current flow.
- When to Call a Pro: If you find damaged wiring that you’re not comfortable repairing, or if you suspect a deeper electrical problem (like a motor winding issue) after exhausting other options, it’s best to consult a qualified electrician or appliance repair technician. Electrical work can be dangerous if not done correctly.
Motor Overheating or Failure
In some cases, especially with older or heavily used fans, the motor itself might be failing. This can be due to prolonged overheating, worn-out internal components, or a burned-out winding. If you’ve tried all other solutions and the motor still hums without spinning, this could be the unfortunate reality.
- Problem: The motor’s internal components are damaged beyond simple repair, or thermal protection has tripped permanently.
- Solution: Motor Replacement or New Fan
- Motor Replacement: For high-value or antique fans, finding and replacing the entire motor might be an option. However, motor components can be expensive and difficult to source for many standard electric fans.
- New Fan: For most consumer-grade electric fans, replacing the entire fan is often more cost-effective and practical than replacing a motor.
“A humming fan that refuses to spin is often a plea for attention. Before you give up, remember that most of these issues boil down to either a simple obstruction or a tired capacitor. A little elbow grease and the right part can bring your cooling companion back to life.” – Alex Phan, Electric Fan Technician & Enthusiast
Preventing Future Fan Failures: Maintenance Tips
Regular maintenance can significantly extend the life of your electric fan and help prevent the “humming but not spinning” problem.
- Regular Cleaning: At least once every few months (more often in dusty environments or with pets), unplug your fan, remove the grilles and blades, and thoroughly clean them. Wipe down the motor housing to prevent dust from entering the bearings.
- Periodic Lubrication: If your fan has accessible motor bearings (most do), apply a few drops of light machine oil annually. This keeps the bearings running smoothly and prevents seizing.
- Proper Storage: When storing your fan for the off-season, cover it to prevent dust accumulation. Store it in a dry place.
- Recognize Early Warning Signs: Pay attention to any unusual noises, slower-than-normal operation, or increased heat from the motor. Addressing minor issues early can prevent major breakdowns.
Conclusion
A humming electric fan that won’t spin can be a nuisance, but it’s rarely a death knell for the appliance. By methodically troubleshooting potential mechanical obstructions, seized bearings, and faulty capacitors, you can often bring your fan back to full working order. Remember to prioritize safety by always unplugging the fan before any inspection or repair. Regular cleaning and occasional lubrication are your best defense against this common problem, ensuring your electric fan continues to provide a refreshing breeze for years to come. What’s the oldest electric fan you’ve managed to bring back to life?
Frequently Asked Questions
Why does my electric fan hum but only start with a push?
If your electric fan hums and only starts spinning when you give the blades a manual push, it’s almost certainly due to a weak or faulty start capacitor. This component is responsible for providing the initial electrical surge needed to get the motor rotating. When it weakens, the motor gets power (causing the hum) but lacks the necessary “kick” to overcome inertia on its own. Replacing the capacitor is usually the fix.
Can I fix a humming fan myself, or do I need a professional?
Many humming fan issues, particularly those caused by dust accumulation, seized bearings, or a faulty capacitor, can be fixed by a DIY enthusiast with basic tools and some patience. If the problem involves complex wiring, motor windings, or you are uncomfortable with electrical repairs, it’s best to consult a professional electrician or appliance repair technician for safety and effective resolution.
What kind of lubricant should I use for fan bearings?
For lubricating electric fan motor bearings, you should use a light machine oil such as 3-in-1 oil. Some people also use silicone-based lubricants. Avoid heavy grease or oils that can attract more dust and gum up the mechanism over time. If the bearings are severely seized, a penetrating oil like WD-40 can be used first to loosen them, but it should be followed by a proper machine oil for long-term lubrication.
How do I know if my fan motor is burned out?
Signs of a burned-out fan motor include a strong burning smell (like burnt plastic or electrical insulation), visible scorching or discoloration on the motor housing, or the motor being extremely hot to the touch even after a short period of operation. If the fan hums but never spins, even with a manual push, and you’ve ruled out capacitor or seized bearing issues, a motor failure is highly probable.
Is it dangerous if my fan hums and doesn’t spin?
Yes, a fan that hums but doesn’t spin can be dangerous. The humming indicates that the motor is receiving electrical current but cannot rotate, causing it to overheat. This continuous overheating can damage the motor, melt plastic components, or in severe cases, pose a fire hazard. It’s crucial to unplug the fan immediately and address the issue before further use.