A sticky electric fan in your kitchen is more than just an eyesore; it’s a testament to countless meals prepared and memories made. Yet, this greasy build-up can drastically reduce your fan’s efficiency, circulate unpleasant odors, and even pose a safety risk. As an admin of ElectricFanatic.com with over a decade of experience in the world of electric fans, I understand the challenge of tackling this stubborn grime. This guide will walk you through a thorough, safe, and effective cleaning process, ensuring your kitchen fan operates like new, providing optimal ventilation and a fresher home environment.
Electric Fans and Kitchen Grease: An Overview
Kitchens are the heart of many homes, but they are also zones of constant activity, especially cooking. When you fry, sauté, or roast, tiny particles of oil, steam, and food residue become airborne. These particles, often invisible, eventually settle on nearby surfaces, and your kitchen fan is a prime target. The combination of circulating air and these airborne particles creates a persistent, sticky film on fan blades, housings, and filters. This accumulation of grease and dust can lead to several problems. Initially, it reduces the fan’s airflow, making it less effective at removing smoke and odors. Over time, it can put a strain on the motor, leading to decreased longevity and increased energy consumption. For exhaust fans, heavy grease buildup can even become a fire hazard.
Kitchen exhaust fans (range hoods) are particularly susceptible, as their primary job is to draw away cooking byproducts directly. However, ceiling fans in kitchens, or even portable electric fans used nearby, can also accumulate a similar sticky, grimy residue, impairing their performance and making them unsightly.
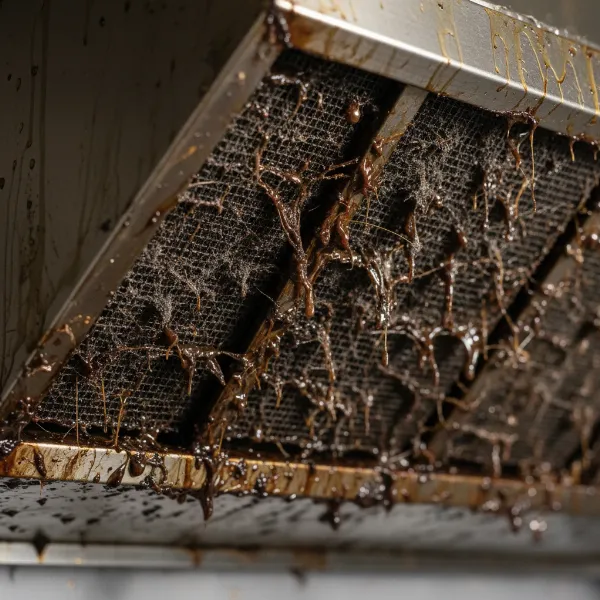 Close-up of a kitchen exhaust fan with heavy, sticky grease and dust buildup on its filters and housing.
Preparing for a Deep Clean: Safety First
Before you begin any cleaning process, prioritize safety. Working with electrical appliances, especially when water and cleaning solutions are involved, requires careful attention to detail.
Essential Tools and Supplies
Gathering all your materials beforehand will streamline the cleaning process and prevent interruptions. You’ll need:
- Cleaning Agents:
- Baking soda
- Liquid dish soap (a good degreaser)
- White vinegar (optional, for soaking or tougher spots)
- Commercial kitchen degreaser (for extremely heavy buildup)
- Cleaning Tools:
- Microfiber cloths (several)
- Non-abrasive sponges or soft brushes
- Paper towels
- Screwdriver set (for disassembly)
- Large bucket or sink (for soaking removable parts)
- Sturdy step ladder (for ceiling fans or high exhaust hoods)
- Safety Gear:
- Rubber gloves
- Safety glasses (optional, but recommended when working with degreasers)
|
Our Picks for the Best Electric fan in 2026
As an Amazon Associate I earn from qualifying purchases.
|
||
| Num | Product | Action |
|---|---|---|
| 1 | Amazon Basics 16" Pedestal Fan with Remote, Floor Fan, Standing Fan for Bedroom, Living Room, Office, with 3 Speeds, 3 Modes, Timer, Dual-Layered Blades, Adjustable Height, Tilt Head, 60W, Black |

|
| 2 | 10" Modern Standing Fan for Bedroom, Sleek Oscillating Pedestal Fan, 3-Speed & Height Adjustable Compact Floor Fan for Home Office & Dorm |
|
| 3 | LEVOIT Tower Fan for Bedroom, 25ft/s Velocity Standing Fan with 28dB Quiet for Sleep, Remoter, 12H Timer, 5 Speeds, 4 Modes, 90° Oscillation for Home, Office, Indoor, Bladeless 36 inch, White |
|
| 4 | Lasko 2520 Oscillating Stand Fan,White 16 Inch |
|
| 5 | Dreo Fan for Bedroom, 120° Oscillating Standing Fans, Quiet Floor Fan with DC Motor, 100ft Pedestal Fans for Room, 9 Speeds, 4 modes, 20dB, 120° Manual Vertical, 37-42" Adjustable Height, 9H Timer |
|
| 6 | Viniper Portable Rechargeable Fan, Small Desk Fan : 3 Speeds & about 8-24 Hours Longer Working, 180 Rotation, Portable Desktop Fan Small but Mighty, Strong Wind (White, Light Black Blade)6.2 Inch |
|
| 7 | XPOWER FC-100S Multipurpose 11 Pro Air Circulator Utility Fan with Oscillating Feature |
|
| 8 | Dreo Tower Fan for Bedroom, 25ft/s Velocity Quiet Floor Fan, 90° Oscillating Fans for Indoors with 4 Speeds, 4 Modes, 8H Timer, Standing Fans, Bladeless Fan, Black, Nomad One (DR-HTF007) |
|
| 9 | Amazon Basics Air Circulator Fan, Desk Fan for Bedroom, Home and Office, With 90-Degree Tilt Head, 3 Speed Settings, Lightweight (3 LBS), 35 Watts, Black, 11.1"W x 6.3"D x 10.9"H |
|
| 10 | Dreo Fan for Bedroom, 120° Oscillating Standing Fan, Quiet Floor Fan with DC Motor, Pedestal Fan for Room, 9 Speeds, 4 modes, 20dB, 120° Manual Vertical, 37-42" Adjustable Height, 9H Timer, Black |
|
Crucial Safety Precautions
Your safety is paramount. Follow these precautions diligently:
- Unplug the Fan: This is the most critical step. Always ensure the fan is completely disconnected from its power source before touching any part of it. For exhaust fans hardwired into the wall, switch off the corresponding circuit breaker. If the fan is part of a microwave unit, unplug the microwave.
- Allow to Cool: If you’ve recently cooked, wait for the fan and surrounding areas to cool down completely to avoid burns.
- Avoid Electrical Components: Never spray cleaning liquids directly into the motor housing or any exposed electrical wiring. Wring out sponges and cloths thoroughly to prevent excess moisture from dripping into sensitive areas.
- Use Gloves: Cleaning grease can be messy and harsh on your hands. Rubber gloves protect your skin from grime and cleaning agents.
- Stable Footing: When working on ceiling fans or high exhaust hoods, always use a sturdy ladder and, if possible, have someone stabilize it for you.
Step-by-Step Guide to Cleaning Your Greasy Fan
Once you’ve prepared and secured your workspace, you’re ready to tackle the sticky grease. The process may vary slightly depending on whether you’re cleaning an exhaust fan or a kitchen ceiling fan, but the core principles remain the same.
Disassembly (Exhaust Hoods and Some Ceiling Fans)
For many kitchen fans, particularly exhaust hoods, disassembling certain parts is necessary for a thorough clean.
- Exhaust Hood Filters: Most exhaust hoods have mesh, charcoal, or baffle grease filters. Locate the levers or tabs that hold them in place and unlatch them. The filters should pop out easily, though stubborn grease might make them stick; a butter knife or similar dull object can help coax them loose. If your hood has a charcoal filter for odors, note that these are usually replaced, not cleaned, every few months depending on cooking frequency.
- Fan Covers/Grills: Depending on your fan model, you might need to remove a decorative cover or grill to access the fan blades directly. Use a screwdriver if necessary and keep all screws in a safe place.
- Consult Your Owner’s Manual: Always refer to your fan’s owner’s manual for specific disassembly instructions to avoid damaging components.
Initial Loose Debris and Grease Removal
Start by removing any loose debris and the superficial layer of grease. This makes the subsequent deep cleaning much easier.
- Use dry paper towels or a dry microfiber cloth to wipe away as much loose dust and grime as possible from the fan blades and accessible surfaces. This pre-cleaning step prevents creating a muddy mess when you introduce cleaning solutions.
Tackling Stubborn Sticky Grease with Soaking (Filters & Removable Parts)
For heavily greased filters and other removable parts, soaking is often the most effective method.
- Fill a large sink or bucket with scalding hot water. The hotter the water, the better it will be at breaking down grease. If your tap water isn’t hot enough, use a kettle to boil water and carefully pour it into the sink.
- Add a generous squirt of liquid dish soap (known for its degreasing properties) and approximately ½ cup of baking soda to the hot water. You can also add three tablespoons of vinegar for an extra boost. Agitate the solution until it’s foamy using a long utensil to avoid burning your hands.
- Completely immerse your dirty filters and any other removable greasy parts in the hot, soapy solution. Let them soak for 10 to 20 minutes for moderate buildup, or up to 30 minutes for tougher grime. If parts don’t fit entirely, flip them halfway through or soak them in a walled sheet pan.
- The alkaline nature of baking soda helps dissolve grease and dirt, making it a powerful natural cleaner.
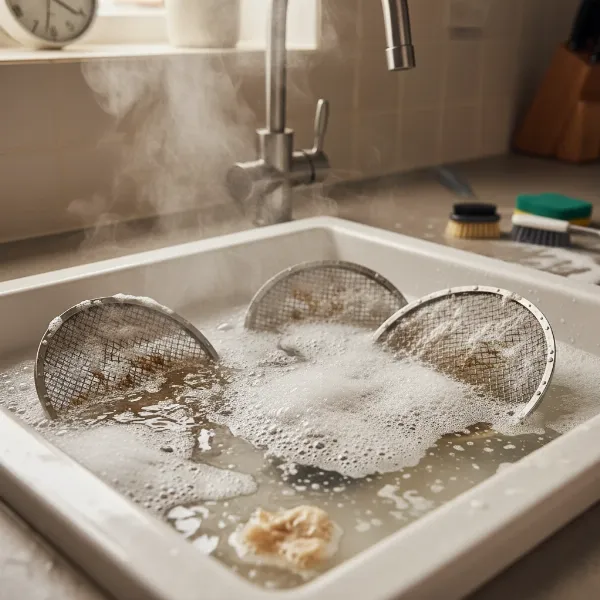 Kitchen exhaust fan filters soaking in hot, soapy water with baking soda in a large sink for degreasing.
Cleaning Fan Blades and Housing (Non-Removable Parts)
While your removable parts are soaking, focus on the non-removable sections of the fan.
- For Heavy Grease Buildup: Create a paste by mixing baking soda with a few drops of water in a small bowl. For extremely stubborn grease, add a few drops of dishwashing soap to the paste.
- Apply the paste or a thin layer of liquid dishwasher soap directly to the greasy areas of the fan blades and housing. Let it sit for 15 to 30 minutes to allow the cleaning agents to penetrate and break down the grease.
- Using a soft, damp sponge or microfiber cloth, gently scrub the affected areas. Work in the direction of the grain for stainless steel to prevent scratches.
- For greasy ceiling fan blades, wipe repeatedly with a damp microfiber cloth. If grime persists, apply a small amount of a degreasing household cleaner to the cloth and scrub until the blades no longer feel sticky.
- Remember to wring out your sponge or cloth thoroughly before applying it to surfaces, especially near electrical components, to prevent water damage.
Rinsing and Drying Thoroughly
This step is crucial for preventing streaks and, more importantly, avoiding electrical hazards.
- Return to your soaking filters and scrub away any residual grease with a non-abrasive sponge or brush. If they’re still grimy after soaking, repeat the soaking process rather than aggressive scrubbing, which can damage mesh filters.
- Rinse all cleaned parts (both soaked and wiped) thoroughly with warm, clean water until all soap residue is gone. For filters, a high-pressure sprayer attachment in your sink can help clear between grid cells.
- Gently shake off excess water from removable parts. Then, meticulously dry all components with a clean microfiber cloth. To ensure all moisture is gone, allow parts to air dry for an hour or two, or even overnight, before reassembling. Leaving moisture on inner components can result in electrical malfunctions and decrease the lifespan of your unit.
Reassembly and Final Check
Once everything is sparkling clean and completely dry, it’s time to put your fan back together.
- Carefully reattach all filters, covers, and any other parts you removed. Ensure all locking mechanisms, tabs, or screws are securely fastened.
- Once fully reassembled, plug the fan back in (or switch the circuit breaker back on).
- Turn the fan on to ensure everything is operating correctly and efficiently. Enjoy the improved airflow and fresh scent!
Natural vs. Commercial Cleaners: A Comparison
When tackling kitchen grease, you have a choice between readily available natural solutions and specialized commercial products. Both have their merits.
Natural Solutions: Baking Soda, Vinegar, and Dish Soap
- Baking Soda: This pantry staple is an alkaline substance that effectively dissolves grease and dirt when combined with a liquid like water or vinegar. It’s inexpensive, non-toxic, odorless, and safe to use around food and family members. It also neutralizes unpleasant smells.
- Dish Soap: Most liquid dish soaps are formulated to cut through grease on dishes, making them excellent degreasers for fan components. They are also gentle on surfaces.
- White Vinegar: An acidic cleaner, vinegar can help break down mineral deposits and some greases, and it’s effective when combined with baking soda or dish soap.
These natural options are often sufficient for regular cleaning and moderate grease buildup. They are eco-friendly and don’t introduce harsh chemicals or fumes into your home.
Commercial Degreasers
For extremely heavy, caked-on, or aged grease, commercial kitchen degreasers can be very powerful.
- Benefits: Designed for tough grease, they often work faster.
- Precautions: Always read and follow the manufacturer’s instructions carefully. Ensure adequate ventilation when using them, wear gloves and safety glasses, and avoid contact with skin and eyes. Test in an inconspicuous area first to ensure they don’t damage your fan’s finish. Never spray them directly into electrical components.
“For light grease build-up, a baking soda paste is often enough. For heavy grease, a thin layer of liquid dishwasher soap or a dedicated kitchen degreaser can penetrate and loosen stubborn grime.” – ElectricFanatic.com Technical Team
Maintaining a Grease-Free Kitchen Fan
Consistent maintenance is key to preventing future major cleaning sessions and prolonging your fan’s life.
Regular Cleaning Schedule
The frequency of cleaning depends on your cooking habits:
- Frequent Cooks (daily cooking, lots of frying): Aim to clean your exhaust fan filters every three to four months. The fan blades and housing might need attention every six months.
- Less Frequent Cooks: You might be able to extend cleaning to every six months or even annually for the deeper clean.
- Kitchen Ceiling Fans: If your kitchen has a ceiling fan, wipe its blades with a damp cloth every 1-2 months to prevent sticky dust accumulation.
Best Practices During Cooking
- Always Use Your Fan: Turn on your exhaust fan every time you cook, even for light tasks. This pulls grease, smoke, and odors out of the air before they can settle on surfaces.
- Use the Right Speed: Adjust the fan speed according to what you’re cooking. Higher speeds for frying or strong-smelling foods.
Quick Wipes
- After cooking, especially if you notice any splatters, give accessible fan surfaces a quick wipe-down with a damp cloth. This prevents fresh grease from hardening and becoming a sticky problem later.
Troubleshooting Common Cleaning Challenges
Even with the best techniques, you might encounter some challenges.
- Extremely Stubborn Grease: If grease remains after the first cleaning attempt, don’t despair. Repeat the soaking or paste application process, allowing for longer dwell times (e.g., 45-60 minutes). Sometimes, multiple applications are needed for severely neglected fans. A plastic scraper (like an old credit card) can carefully help lift thick layers before scrubbing.
- Protecting Finishes: When cleaning stainless steel components, always wipe in the direction of the grain to avoid visible scratches. Avoid abrasive scrubbers that can mar surfaces.
- Electrical Concerns: If you are unsure about disassembling any electrical components or suspect electrical issues with your fan, it’s always best to consult a qualified electrician.
Conclusion
A clean, efficiently running electric fan is a vital component of a comfortable and healthy kitchen. Tackling sticky kitchen grease might seem like a daunting task, but with the right tools, techniques, and a commitment to safety, you can restore your fan to its optimal condition. Regular maintenance, coupled with these deep-cleaning strategies, will not only keep your kitchen fresher and more inviting but also extend the lifespan of your appliance. Remember, a little proactive cleaning goes a long way in ensuring your Electric Fan remains a quiet, effective workhorse against kitchen grime.
What strategies have you found most effective for keeping your kitchen fan spotless?
Frequently Asked Questions
How often should I clean my kitchen exhaust fan?
For daily cooks or those who fry frequently, cleaning exhaust filters every three to four months is recommended, with a deeper clean of the blades and housing every six months. If you cook less often, you might extend this to every six months to a year for the deeper clean. Regular quick wipes can also help maintain cleanliness between deep cleans.
Can I use bleach on a greasy fan?
No, it is generally not recommended to use bleach or other harsh chemical cleaners on greasy fans. Bleach can damage certain finishes, particularly stainless steel, and its fumes can be dangerous, especially when combined with grease or other cleaning agents. Stick to dish soap, baking soda, vinegar, or dedicated kitchen degreasers.
What’s the best way to clean fan filters?
The best way to clean greasy fan filters is by soaking them in a solution of very hot water, liquid dish soap, and about ½ cup of baking soda for 10-30 minutes. This helps to break down the sticky residue. After soaking, gently scrub with a non-abrasive sponge and rinse thoroughly with warm water, ensuring they are completely dry before reassembly.
Why does my kitchen fan get so sticky?
Your kitchen fan gets sticky due to the accumulation of airborne grease particles, steam, and dust generated during cooking. These particles adhere to the fan surfaces, creating a tenacious, sticky film that builds up over time. Using your fan consistently during cooking can help reduce this buildup.
Is a sticky fan dangerous?
Yes, a heavily sticky and greasy exhaust fan can be dangerous. Excessive grease buildup, particularly in exhaust hoods, can become a fire hazard, as grease is flammable. It also reduces the fan’s efficiency, forcing the motor to work harder and potentially leading to overheating or premature failure.