That persistent squeak from your electric fan can turn a refreshing breeze into an irritating nuisance, disrupting your peace and quiet. Whether it’s a ceiling fan, a trusty pedestal unit, or a compact desk fan, a noisy fan is a common household problem that many assume requires professional help or even a costly replacement. But what if you could restore tranquility to your living space with a few simple, hands-on steps? This comprehensive DIY guide will walk you through the five easy stages to diagnose and fix a squeaky electric fan, helping you reclaim the quiet comfort you deserve.
Understanding Why Your Electric Fan Squeaks
Before diving into repairs, knowing the root cause of the noise can make the fix much more straightforward. An electric fan’s squeak is usually a cry for attention from one of its core components, signaling a need for cleaning, tightening, or lubrication.
Common Culprits Behind the Creak
- Dust and Grime Buildup: Over time, dust, pet hair, and airborne particles accumulate on fan blades, grilles, and within the motor housing. This buildup can create imbalance, causing the fan to wobble and produce noise as it spins, or interfere with the smooth movement of internal parts.
- Loose Fasteners and Components: Vibrations from regular use can gradually loosen screws and bolts. Blade attachment screws, the motor housing, the oscillation mechanism, or even a light kit on a ceiling fan can all become loose, leading to rattling, clicking, or squeaking sounds as the fan operates.
- The Need for Lubrication: Motor and Bearings: The motor shaft and its associated bearings or bushings are critical for the fan’s smooth rotation. Without adequate lubrication, these metal-on-metal components create friction, which manifests as an unpleasant squeak. This is often the primary cause for older fans or those that run continuously.
- Wear and Tear: When Parts Give Out: While less common, continuous use can lead to worn-out bearings or other internal motor components. If lubrication doesn’t resolve the issue, significant wear might be the underlying problem, indicating that some parts may need replacement or that the electric fan is nearing the end of its lifespan.
|
Our Picks for the Best Electric fan in 2026
As an Amazon Associate I earn from qualifying purchases.
|
||
| Num | Product | Action |
|---|---|---|
| 1 | XPOWER FC-100S Multipurpose 11 Pro Air Circulator Utility Fan with Oscillating Feature |

|
| 2 | Dreo Fan for Bedroom, 120° Oscillating Standing Fans, Quiet Floor Fan with DC Motor, 100ft Pedestal Fans for Room, 9 Speeds, 4 modes, 20dB, 120° Manual Vertical, 37-42" Adjustable Height, 9H Timer |
|
| 3 | Viniper Portable Rechargeable Fan, Small Desk Fan : 3 Speeds & about 8-24 Hours Longer Working, 180 Rotation, Portable Desktop Fan Small but Mighty, Strong Wind (White, Light Black Blade)6.2 Inch |
|
| 4 | Dreo Tower Fan for Bedroom, 25ft/s Velocity Quiet Floor Fan, 90° Oscillating Fans for Indoors with 4 Speeds, 4 Modes, 8H Timer, Standing Fans, Bladeless Fan, Black, Nomad One (DR-HTF007) |
|
| 5 | LEVOIT Tower Fan for Bedroom, 25ft/s Velocity Standing Fan with 28dB Quiet for Sleep, Remoter, 12H Timer, 5 Speeds, 4 Modes, 90° Oscillation for Home, Office, Indoor, Bladeless 36 inch, White |
|
| 6 | Dreo Fan for Bedroom, 120° Oscillating Standing Fan, Quiet Floor Fan with DC Motor, Pedestal Fan for Room, 9 Speeds, 4 modes, 20dB, 120° Manual Vertical, 37-42" Adjustable Height, 9H Timer, Black |
|
| 7 | Amazon Basics Air Circulator Fan, Desk Fan for Bedroom, Home and Office, With 90-Degree Tilt Head, 3 Speed Settings, Lightweight (3 LBS), 35 Watts, Black, 11.1"W x 6.3"D x 10.9"H |
|
| 8 | Lasko 2520 Oscillating Stand Fan,White 16 Inch |
|
| 9 | Amazon Basics 16" Pedestal Fan with Remote, Floor Fan, Standing Fan for Bedroom, Living Room, Office, with 3 Speeds, 3 Modes, Timer, Dual-Layered Blades, Adjustable Height, Tilt Head, 60W, Black |
|
| 10 | 10" Modern Standing Fan for Bedroom, Sleek Oscillating Pedestal Fan, 3-Speed & Height Adjustable Compact Floor Fan for Home Office & Dorm |
|
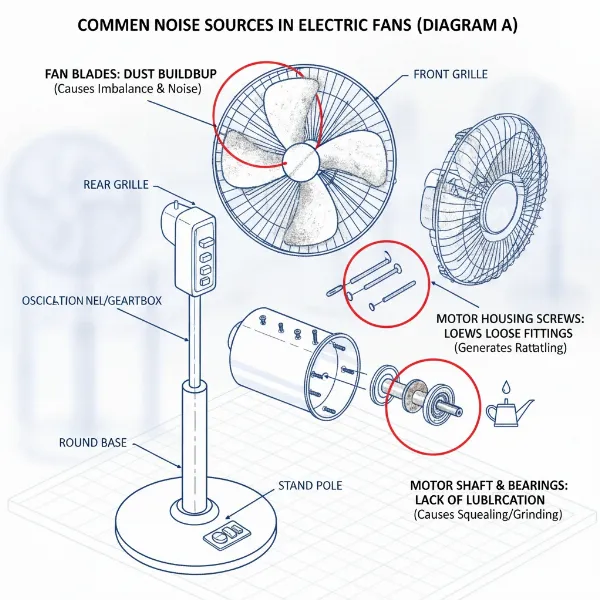 Diagram illustrating common causes of electric fan squeaking: dust, loose parts, and lack of lubrication.
Gather Your Gear: Tools and Safety First
Tackling a squeaky electric fan is a manageable DIY project, but having the right tools and prioritizing safety are paramount.
Essential Tools for the Job
You won’t need a professional toolkit to get your fan running silently again. Most of these items are likely already in your home:
- Screwdriver Set: A basic set with Phillips and flathead screwdrivers will be indispensable for disassembling and tightening components.
- Damp Rag/Microfiber Cloths: For effective cleaning of blades, grilles, and housing.
- Vacuum Cleaner with Brush Attachment or Compressed Air: To remove stubborn dust and debris from hard-to-reach areas, especially around the motor.
- Fan Lubricant/Light Machine Oil: Crucial for lubricating the motor shaft and bearings. Look for electric motor oil, 3-in-1 motor oil, or a fan-specific lubricant. Avoid using penetrating oils like WD-40, as they are not long-term lubricants and can attract more dust.
- Pipe Cleaner or Cotton Swab (Optional): Useful for applying oil to small access holes or hard-to-reach bearings.
- Work Gloves: To protect your hands during disassembly and cleaning.
Prioritizing Your Safety
Working with electrical appliances always requires caution.
“Safety is not just a slogan; it’s a prerequisite for any home repair. Always disconnect power first. It’s the simplest step, but the most important.” – John Smith, Master Electrician at ElectroFix Services
- Unplug the Fan: This is the most critical step. Always ensure your electric fan is completely unplugged from its power source before you begin any work. For ceiling fans, turn off the power at the circuit breaker.
- Allow Cooling Time: If the fan has been running recently, give the motor time to cool down before touching it.
- Work in a Well-Lit Area: Good visibility helps you identify components, screws, and potential issues clearly.
- Follow Manufacturer’s Instructions: If you have your fan’s owner’s manual, consult it for specific disassembly, cleaning, and lubrication guidelines, as models can vary.
Your 5-Step DIY Guide to Fixing a Squeaky Electric Fan
Now that you’re prepared, let’s silence that squeak with these straightforward steps.
Step 1: Disconnect Power and Disassemble
The first and most crucial step is to cut the power. Once unplugged, carefully begin disassembling your fan.
Start by removing the front grille or cage, often held by clips or small screws. Next, remove the fan blade or blades. For many fans, a cap or nut secures the blade assembly to the motor shaft, usually with a reverse thread (turn clockwise to loosen). Gently pull the blades straight off the shaft. If it’s an oscillating fan, you might need to remove the rear grille as well to fully access the motor.
Step 2: Thoroughly Clean Every Component
Dust and grime are silent noise contributors. A thorough cleaning can often resolve minor squeaks and prevent future ones.
Use a damp rag or microfiber cloth to wipe down all removed parts: the front and rear grilles, and especially the fan blades. Pay close attention to the motor housing and any exposed areas of the motor. For intricate grilles or tight spots around the motor, use a vacuum cleaner with a brush attachment or a can of compressed air to dislodge accumulated dust. Ensure all components are completely dry before proceeding.
Step 3: Tighten All Screws and Connections
Loose connections are a frequent cause of rattling and squeaking. Systematic tightening can significantly reduce noise.
Working from the outside in, check every screw. Start with the screws that attach the fan blades to their mounting bracket, if applicable. Then, move to any visible screws on the motor housing. For oscillating fans, check the screws on the base or the pivot points of the oscillation mechanism. For ceiling fans, ensure the downrod screws, canopy screws, and any light kit screws are snug. Be firm but avoid overtightening, which can strip threads or crack plastic.
Step 4: Lubricate the Motor Shaft and Bearings
Friction is the enemy of silence. Lubrication is key to smooth operation.
Locate the motor shaft where the fan blades attach. For some electric fans, you might find a small oil port or hole near the motor. If so, use a pipe cleaner or cotton swab to apply a few drops of electric motor oil into this opening. For fans without a dedicated oil port, you’ll need to apply the oil directly to the motor shaft where it enters the motor housing, and to any visible bearings or bushings. Gently push and pull the motor shaft (if possible) or rotate it by hand to help the oil penetrate. Allow a few minutes for the lubricant to work its way in. “Using the correct lubricant is vital; general-purpose oils can attract dust and attract more problems,” advises Sarah Chen, Appliance Repair Specialist.
 Close-up of a hand applying lubricant to an electric fan's motor shaft with an oiler.
Step 5: Reassemble and Test for Silence
Once cleaned, tightened, and lubricated, it’s time to put your electric fan back together.
Carefully reattach the fan blades, ensuring they are oriented correctly and secured tightly. Reinstall the rear grille (if removed) and then the front grille. Double-check that all covers are securely in place and that no wires are pinched or obstructing the blades. Finally, plug your electric fan back in and turn it on. Start with the lowest speed setting and listen carefully. Gradually increase the speed, noting if the squeak has disappeared or significantly reduced.
When DIY Isn’t Enough: Advanced Troubleshooting & Replacement
While the five steps above resolve most squeaky fan issues, sometimes the problem runs deeper.
Recognizing Severely Worn Parts
If, after thorough cleaning, tightening, and lubrication, your electric fan still emits a persistent squeak or develops a grinding noise, it’s possible that the motor’s internal bearings are severely worn. These components are usually sealed and not easily accessible for DIY replacement without specialized tools and expertise. In such cases, the fan might operate noisily for a while longer, or it could seize up completely.
Professional Help or a New Electric Fan?
Deciding whether to seek professional repair or buy a new fan depends on several factors:
- Cost: The repair cost for a severely worn motor might approach or exceed the price of a new, entry-level electric fan.
- Age of the Fan: Older fans, especially inexpensive models, might not be worth the repair effort or cost.
- Type of Fan: High-end ceiling fans or unique vintage models might warrant professional repair due to their value or specific design.
- Your Skill Level: Attempting complex motor disassembly without experience can cause further damage.
If the noise persists and you’re not comfortable delving into motor internals, consider the economic and practical aspects of replacing your electric fan. Many modern electric fans offer improved energy efficiency and quieter operation.
Keeping Your Electric Fan Quiet: Preventive Maintenance
A little proactive care goes a long way in preventing future squeaks and extending the life of your electric fan.
Regular Cleaning Habits
Make it a habit to clean your electric fan every few weeks, or at least monthly, especially during periods of heavy use. A quick wipe-down of blades and grilles can prevent dust buildup from becoming a significant problem. For ceiling fans, a long-handled duster or vacuum attachment works wonders. This simple routine keeps your fan balanced and free from friction-causing debris.
Proactive Lubrication
Depending on how frequently you use your electric fan, consider annual or biannual lubrication. If your fan has accessible oil ports, a few drops of appropriate fan oil once a year can keep the motor running smoothly and quietly. Even if it requires some disassembly, periodic lubrication is a small effort to maintain performance.
Proper Storage for Longevity
When not in use for extended periods, such as during winter months, clean your electric fan thoroughly before storing it. Cover it with a cloth or place it in its original packaging to protect it from dust accumulation. Storing your fan in a dry, safe place also prevents accidental damage or misalignment of components, ensuring it’s ready for quiet operation when you need it next.
Conclusion
A squeaky electric fan doesn’t have to be a permanent fixture in your home. By understanding the common causes and following these five easy DIY steps—disconnecting power, thorough cleaning, tightening all fasteners, proper lubrication, and careful reassembly—you can effectively troubleshoot and silence most noisy fans. Regular maintenance, including consistent cleaning and proactive oiling, will ensure your electric fan provides a comfortable, quiet breeze for years to come. Don’t let a minor squeak turn into a major headache; empower yourself with these simple fixes and enjoy the calm hum of a well-maintained electric fan.
What common household items have you successfully repaired with a simple DIY approach?
Frequently Asked Questions
What kind of oil should I use for a squeaky electric fan?
For a squeaky electric fan, use electric motor oil or a general-purpose light machine oil, often labeled as “3-in-1 motor oil.” These oils are specifically designed for small electric motors and bearings. Avoid using lubricants like WD-40, as they are primarily penetrating oils, not long-lasting lubricants, and can attract dust, potentially worsening the problem over time.
How often should I clean my electric fan?
The frequency of cleaning depends on usage and environment. For daily use, aim to clean your electric fan blades and grilles monthly. If your home is particularly dusty or you have pets, more frequent cleaning (every two to three weeks) might be beneficial. A deeper clean involving partial disassembly and motor area dusting can be done every three to six months.
Can I use WD-40 to lubricate my fan?
While WD-40 might offer temporary relief, it is generally not recommended for lubricating electric fan motors or bearings. WD-40 is a solvent and water displacement spray, not a true long-term lubricant. It can evaporate quickly, leave a sticky residue that attracts dust, and potentially damage the motor or bushings over time, leading to more severe squeaking or failure.
Why is my brand new electric fan squeaking?
Even new electric fans can sometimes squeak. Common reasons include minor manufacturing defects, loose screws from shipping or assembly, or insufficient lubrication from the factory. Before returning it, try tightening all visible screws and, if accessible, applying a small amount of electric motor oil to the motor shaft. If the problem persists, it’s best to contact the manufacturer for warranty service.
When is it time to replace a squeaky fan instead of fixing it?
Consider replacing a squeaky Electric Fan if the noise persists after cleaning, tightening, and proper lubrication, especially if it’s accompanied by grinding sounds, significant wobble, or reduced performance. If the cost of repair (e.g., replacing worn-out sealed bearings) is comparable to buying a new fan, or if the fan is very old, replacement is often the more practical and cost-effective solution.