Wall-mounted electric fans are a fantastic solution for maximizing floor space while delivering powerful, targeted airflow. Whether you’re battling the summer heat in a compact apartment or need extra circulation in a workshop, these fans offer both convenience and comfort. However, installing a fan securely, especially on drywall, requires careful attention to detail and the right approach to ensure both safety and longevity. This comprehensive guide will walk you through every step, from selecting the ideal spot to the final safety checks, empowering you to confidently install your wall-mounted electric fan.
Wall-Mounted Fans: Overview and Types
Electric fans have evolved significantly, and wall-mounted variants stand out for their practicality. Unlike floor or desk fans, they free up valuable real estate, making them perfect for smaller rooms, garages, or areas where obstructions are a concern. Their elevated position often allows for better air distribution throughout a space.
Common types include:
- Oscillating Fans: These fans pivot automatically, sweeping air across a wider area, ideal for general room cooling.
- Fixed-Position Fans: Perfect for directing airflow to a specific spot, such as a workbench or a particular seating area.
- Industrial/Commercial Fans: Larger and more robust, designed for high-volume airflow in bigger spaces, often requiring more substantial mounting.
- Residential Fans: Typically smaller, quieter, and more aesthetically integrated, suited for home environments.
Regardless of the type, every wall-mounted fan comes with a motor housing, blades, a protective guard, and, crucially, a mounting bracket designed to attach it to the wall. Understanding these components is the first step towards a successful installation.
Choosing the Right Location for Your Wall Fan
Selecting the perfect mounting spot is more than just picking an empty patch of wall; it’s about optimizing performance and ensuring safety.
Optimal Height and Airflow
For most residential wall-mounted fans, an ideal height is generally 7 to 9 feet from the floor. This elevated position allows the fan to circulate air effectively across the entire room without being easily accessible to children or pets, minimizing potential hazards. Consider these factors:
- Clearance: Ensure there are no immediate obstructions like furniture, curtains, or light fixtures that could impede airflow or interfere with the fan’s operation, especially if it oscillates.
- Room Layout: Position the fan where it can circulate air across the largest area of the room, often centrally along a wall or in a corner for corner-to-corner flow.
|
Our Picks for the Best Electric fan in 2026
As an Amazon Associate I earn from qualifying purchases.
|
||
| Num | Product | Action |
|---|---|---|
| 1 | LEVOIT Tower Fan for Bedroom, 25ft/s Velocity Standing Fan with 28dB Quiet for Sleep, Remoter, 12H Timer, 5 Speeds, 4 Modes, 90° Oscillation for Home, Office, Indoor, Bladeless 36 inch, White |

|
| 2 | XPOWER FC-100S Multipurpose 11 Pro Air Circulator Utility Fan with Oscillating Feature |
|
| 3 | 10" Modern Standing Fan for Bedroom, Sleek Oscillating Pedestal Fan, 3-Speed & Height Adjustable Compact Floor Fan for Home Office & Dorm |
|
| 4 | Dreo Fan for Bedroom, 120° Oscillating Standing Fan, Quiet Floor Fan with DC Motor, Pedestal Fan for Room, 9 Speeds, 4 modes, 20dB, 120° Manual Vertical, 37-42" Adjustable Height, 9H Timer, Black |
|
| 5 | Amazon Basics 16" Pedestal Fan with Remote, Floor Fan, Standing Fan for Bedroom, Living Room, Office, with 3 Speeds, 3 Modes, Timer, Dual-Layered Blades, Adjustable Height, Tilt Head, 60W, Black |
|
| 6 | Dreo Fan for Bedroom, 120° Oscillating Standing Fans, Quiet Floor Fan with DC Motor, 100ft Pedestal Fans for Room, 9 Speeds, 4 modes, 20dB, 120° Manual Vertical, 37-42" Adjustable Height, 9H Timer |
|
| 7 | Viniper Portable Rechargeable Fan, Small Desk Fan : 3 Speeds & about 8-24 Hours Longer Working, 180 Rotation, Portable Desktop Fan Small but Mighty, Strong Wind (White, Light Black Blade)6.2 Inch |
|
| 8 | Amazon Basics Air Circulator Fan, Desk Fan for Bedroom, Home and Office, With 90-Degree Tilt Head, 3 Speed Settings, Lightweight (3 LBS), 35 Watts, Black, 11.1"W x 6.3"D x 10.9"H |
|
| 9 | Dreo Tower Fan for Bedroom, 25ft/s Velocity Quiet Floor Fan, 90° Oscillating Fans for Indoors with 4 Speeds, 4 Modes, 8H Timer, Standing Fans, Bladeless Fan, Black, Nomad One (DR-HTF007) |
|
| 10 | Lasko 2520 Oscillating Stand Fan,White 16 Inch |
|
Power Supply and Safety Considerations
The fan’s proximity to a power source is also paramount. Most wall fans are plug-in models, so selecting a location near an existing electrical outlet is convenient and avoids the need for unsightly or hazardous extension cords. If hardwiring is required, always consult a licensed electrician.
Before drilling, safety first:
- Scan for Hazards: Use a reliable stud finder with a wire detection feature to scan the wall for hidden electrical wires, plumbing pipes, or other utilities that could be damaged during drilling. Striking a live wire or a water pipe can lead to serious injury or costly repairs.
- Placement Safety: Avoid placing the fan directly above beds, sofas, or high-traffic areas where it could accidentally fall (though proper installation mitigates this risk). Keep it out of reach of children to prevent injury.
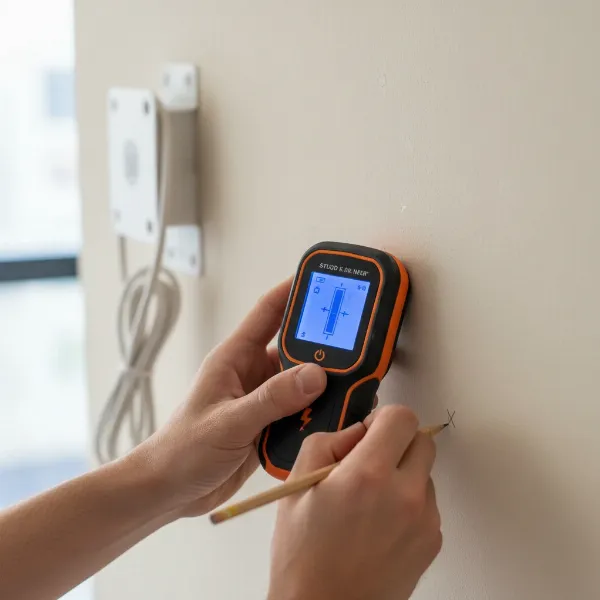 Person using a stud finder on drywall, marking for a wall-mounted fan installation.
Essential Tools and Materials for Installation
Having all your tools and materials ready before you begin will streamline the installation process and prevent frustrating interruptions. Here’s what you’ll typically need:
- Your New Wall-Mounted Fan: Complete with its manufacturer-supplied mounting bracket and hardware.
- Drill: A cordless drill is versatile. Ensure you have appropriate drill bits for pilot holes (matching your chosen anchors).
- Screwdriver Set: Phillips and flathead screwdrivers, or a multi-bit driver.
- Level: A spirit level or laser level to ensure your fan is mounted perfectly straight.
- Measuring Tape: For accurate height and spacing measurements.
- Pencil: For marking pilot holes and bracket positions.
- Stud Finder: Absolutely essential for identifying wall studs and hidden hazards.
- Safety Glasses: To protect your eyes from dust and debris.
- Ladder or Step Stool: To reach your chosen mounting height safely.
Crucial for Drywall: High-Strength Anchoring
Drywall itself cannot support the weight and vibration of a wall-mounted fan. Standard screws will pull out over time. For safe and secure installation on drywall, you must use specialized anchors:
- High-Strength Toggle Bolts: These are highly recommended for their superior holding power. They expand behind the drywall, creating a robust connection. Look for toggle bolts rated to support at least the fan’s weight plus a 15% safety margin.
- Heavy-Duty Expansion Anchors: Similar to toggle bolts, these anchors expand or “grip” the drywall from behind. Ensure they are specifically designed for heavy loads and match the fan’s weight.
Avoid using basic plastic ribbed anchors or self-drilling anchors for anything heavier than a small picture frame, as they lack the tensile strength needed for a dynamic load like a fan.
Step-by-Step Drywall Installation Guide
With your location chosen and tools ready, let’s get that fan mounted! Always refer to your specific fan’s instruction manual, as there may be model-specific nuances.
Locating Studs and Marking Points
The most secure method for mounting anything heavy on drywall is to attach it directly to a wall stud.
- Find the Studs: Use your stud finder to locate the vertical wooden studs behind your drywall. Mark their edges with your pencil. Standard spacing is typically 16 or 24 inches on center.
- Position the Bracket: Hold the fan’s mounting bracket against the wall at your desired height. Align the bracket so that at least one, ideally two, of its mounting holes overlap with a stud. This provides maximum stability.
- Mark Pilot Holes: With the bracket perfectly level (use your spirit level!), use your pencil to mark the precise locations for drilling through the bracket’s holes. If you can’t hit a stud for all holes, you’ll use drywall anchors for the remaining ones.
Drilling Pilot Holes and Installing Anchors
Precise drilling is key to a secure fit.
- Drill Pilot Holes for Studs: If mounting into a stud, select a drill bit slightly smaller than the diameter of your mounting screws. Drill pilot holes directly into the marked stud locations.
- Drill Holes for Drywall Anchors: For any holes that don’t align with a stud, follow the anchor manufacturer’s instructions for drill bit size. Toggle bolts typically require a larger pilot hole than standard screws. Drill these holes with care.
- Install Drywall Anchors: Insert your chosen high-strength toggle bolts or heavy-duty expansion anchors into the drilled holes in the drywall. Follow the manufacturer’s specific instructions for each anchor type to ensure they are properly deployed and secure. The anchor should be flush with the wall surface.
“When dealing with drywall, never underestimate the power of a good toggle bolt. It’s the difference between a fan that stays up for years and one that could become a hazard.” – John Peterson, Certified Home Inspector
Mounting the Fan Bracket
Now, attach the bracket that will hold your fan.
- Align and Secure: Line up the mounting bracket with the installed anchors and pilot holes.
- Insert Screws: Drive the screws through the bracket and into the pilot holes (for studs) and into the drywall anchors.
- Tighten Securely: Use your screwdriver to tighten all screws firmly. Ensure the bracket is snug against the wall and does not wobble. Do not over-tighten, especially if working with plastic components, as this can strip threads or crack the material.
- Test Stability: Once all screws are tightened, gently tug on the bracket to confirm it’s absolutely secure before proceeding.
Assembling and Attaching the Fan
Most wall fans require some minor assembly before being mounted to the bracket.
- Assemble the Fan: Follow your manufacturer’s instructions to assemble the fan unit. This usually involves attaching the blades, front and rear guards, and sometimes the control panel to the motor housing.
- Attach to Bracket: Carefully lift the assembled fan unit and align it with the mounted wall bracket. Most wall fans have a ‘hook-and-hang’ design or a locking mechanism that secures the fan to the bracket. Engage this mechanism fully, ensuring the fan is seated properly and locked into place.
Final Connections and Testing
You’re almost there! It’s time to bring your new fan to life.
- Plug In: Connect the fan’s power cord to the nearest electrical outlet.
- Test Operation: Turn the fan on at all speed settings and engage any oscillation features. Listen for unusual noises, excessive vibration, or wobbling. The fan should operate smoothly and quietly. If you notice any issues, turn off the fan immediately and re-check the installation.
 Wall-mounted electric fan securely attached to its bracket on a drywall, demonstrating proper installation.
Ensuring Safety and Longevity for Your Wall Fan
A correctly installed wall-mounted fan offers years of reliable cooling. By following these safety and maintenance tips, you can ensure its continued performance and safety.
Importance of Manufacturer Instructions and Building Codes
Your fan’s instruction manual is your primary resource. It contains critical information regarding specific mounting hardware, weight limits, assembly steps, and safety warnings unique to your model. Always defer to these instructions. Additionally, always adhere to local electrical and building codes. In some regions, certain installations may require specific wiring or safety measures as stipulated by the National Electrical Code (NEC) or similar regulations. When in doubt, consulting a licensed professional is always the safest course of action.
Selecting the Right Drywall Anchors
Reiterating a crucial point: the type of anchor significantly impacts the safety of your wall fan installation on drywall.
| Anchor Type | Best Use Case | Drywall Suitability for Wall Fans | Notes |
|---|---|---|---|
| Toggle Bolts | Heavy items (shelves, TVs, wall fans) | Excellent | High weight capacity, expands behind drywall for strong grip. |
| Heavy-Duty Expansion Anchors | Medium to heavy items | Good | Expands and grips drywall, ensure weight rating. |
| Self-Drilling Anchors | Light to medium items (curtains, small pictures) | Poor for Fans | Insufficient strength for fan weight and vibration. |
| Plastic Ribbed Anchors | Very light items (small pictures, light decorations) | Never for Fans | Will pull out under fan load. |
Always choose anchors rated for the fan’s static weight plus its dynamic load (due to vibration). A general rule of thumb is to select anchors that collectively support at least 15% more than the fan’s total weight.
Regular Maintenance for Peak Performance
Even after a perfect installation, routine maintenance helps prolong your fan’s life and keeps it running efficiently.
- Clean Regularly: Dust and debris can accumulate on blades, guards, and motor vents, reducing airflow and straining the motor. Clean these components regularly with a soft cloth or a vacuum cleaner attachment.
- Check for Looseness: Periodically inspect the fan and its mounting bracket for any signs of loosening screws or instability. Tighten any loose fasteners.
- Listen for Changes: Pay attention to any new or unusual noises, vibrations, or changes in fan performance, which could indicate a problem.
Where to Purchase Reliable Installation Hardware
When purchasing hardware, especially anchors, prioritize quality and safety. You can find reliable installation hardware at:
- Home Improvement Stores: Large chains like Home Depot and Lowe’s offer a wide selection of anchors, screws, and other mounting hardware.
- Online Retailers: Amazon and specialized hardware websites also carry various options, but always check product reviews and specifications carefully.
Look for products that are UL (Underwriters Laboratories), CSA (Canadian Standards Association), or ANSI/BHMA (American National Standards Institute/Builders Hardware Manufacturers Association) certified. These certifications indicate that the products meet stringent safety and performance standards.
Buying Guide for Your Wall-Mounted Electric Fan
Selecting the right fan is as crucial as installing it correctly. Here are a few questions to guide your purchase:
What Is Your Budget?
Wall fans vary widely in price, from budget-friendly models under $50 to high-performance, feature-rich options over $200. Determine your budget first, but remember that investing in a quality fan often means better performance, durability, and a longer lifespan.
What Is Your Room Size?
Consider the square footage of the room where the fan will be installed. Larger rooms require fans with higher CFM (Cubic Feet per Minute) ratings for effective airflow. Matching the fan’s capacity to your room size ensures optimal cooling.
What Features Do You Need?
Modern wall fans come with a host of features that can enhance comfort and convenience:
- Remote Control: Offers easy operation from anywhere in the room.
- Multiple Speed Settings: Allows you to customize airflow intensity.
- Oscillation: Distributes air more broadly.
- Timer Function: For automatic shut-off.
- Natural Breeze Mode: Simulates varying wind patterns.
- Quiet Operation: Look for models with low decibel ratings, especially for bedrooms or offices.
- Material and Finish: Consider how the fan will blend with your room’s decor. Some brackets offer built-in cable management channels for a cleaner look.
Conclusion
Installing a wall-mounted Electric Fan on drywall, while requiring precision and the right materials, is a manageable DIY project that significantly enhances comfort and frees up valuable space. By diligently selecting the optimal location, utilizing high-strength toggle bolts or heavy-duty expansion anchors, and meticulously following each installation step, you can ensure your fan is securely mounted and operates safely for years to come. Remember to always prioritize safety by locating studs, avoiding hidden hazards, and adhering to your fan’s specific instructions. With these guidelines, you’re well-equipped to enjoy the refreshing breeze and space-saving design of a perfectly installed wall-mounted fan.
Are you ready to transform your living space with the cooling comfort and efficiency of a securely mounted wall fan?
Frequently Asked Questions
How high should I mount a wall fan?
Generally, a wall fan should be mounted between 7 to 9 feet from the floor. This height ensures optimal air circulation throughout the room and keeps the fan safely out of reach of children and pets. Always check your fan’s manual for specific recommendations.
Can I install a heavy wall fan on drywall without a stud?
Yes, you can install a heavy wall fan on drywall without directly hitting a stud, but only if you use high-strength, heavy-duty drywall anchors specifically designed for significant weight. Toggle bolts or heavy-duty expansion anchors are highly recommended, as they create a secure connection by expanding behind the drywall. Standard plastic anchors are not sufficient.
What kind of anchors are best for wall fans on drywall?
For wall fans installed on drywall, toggle bolts are generally considered the best due to their superior holding strength. Heavy-duty expansion anchors are also a good option. Ensure the anchors are rated to support the fan’s weight plus an additional safety margin, typically 15%.
Do I need to find a stud to install a wall fan?
While hitting a wall stud offers the strongest and most secure mounting, it’s not always possible for all mounting points. You should always try to align at least one mounting screw with a stud using a stud finder. For any remaining holes that fall only on drywall, use appropriate heavy-duty drywall anchors like toggle bolts.
What are the critical safety checks after installation?
After installing your wall-mounted fan, ensure all screws are tightly secured, and gently tug on the fan to confirm its stability. Plug it in and test all speed settings and oscillation functions, listening for any unusual noises or vibrations. If anything seems loose or off, turn off the fan immediately and re-examine the installation.