Few things are as frustrating as reaching for your electric fan on a sweltering day, only for it to remain stubbornly silent. Often, the culprit isn’t a dead fan motor but a small, easily replaceable component: a blown fuse in the plug. This common issue can be a simple DIY fix, saving you the cost and hassle of replacing the entire fan. With the right approach and a focus on safety, you can have your fan circulating cool air again in no time.
 A frustrated person standing in front of a silent electric fan on a hot day.
Understanding Why Your Fan Fuse Blows
A fuse is a vital safety device designed to protect your appliance and home from electrical hazards. It contains a thin wire that melts and breaks the circuit when too much current flows through it, preventing damage to the fan’s motor or, worse, an electrical fire.
Several reasons can cause a fan plug fuse to blow:
- Overloaded Circuits: Plugging too many high-power devices into a single outlet or extension cord can draw more current than the circuit or the fan’s fuse can handle.
- Faulty Wiring or Loose Connections: Over time, internal wiring in the fan or the plug itself can become frayed or loose, leading to intermittent resistance and current spikes that blow the fuse.
- Short Circuits: If live wires accidentally touch each other or a metallic part, it creates a direct path for electricity with very low resistance, causing a sudden surge in current that the fuse immediately interrupts.
- Motor Strain: An aging or obstructed fan motor might draw excessive current as it struggles to operate, eventually leading to the fuse blowing as a protective measure. For instance, if a box fan falls flat, its motor may draw more amperage due to struggling, causing the fuse to pop.
Safety First: Essential Precautions Before You Start
Working with electricity always requires caution. Prioritizing safety is paramount when replacing a fuse.
- Always Disconnect Power: Before touching the plug, always unplug the fan from the wall socket. This eliminates any risk of electrical shock.
- Use the Right Tools: Ensure you have the correct size screwdriver for opening the plug. Using an ill-fitting tool can damage the screw heads or the plug casing.
- Never Over-Fuse: It is critical to replace a blown fuse with one of the exact same amperage rating. Using a fuse with a higher amperage can allow dangerous levels of current to flow, potentially damaging the fan, overheating wires, or causing a fire.
- Inspect the Plug and Cord: While you’re at it, visually inspect the fan’s power cord and plug for any signs of damage, such as cuts, frayed wires, or scorch marks. If you find any, the fan or cord should be replaced or professionally repaired.
- If Unsure, Consult a Professional: If you are uncomfortable performing this repair or if the problem persists after fuse replacement, do not hesitate to contact a qualified electrician or appliance repair technician.
Tools You’ll Need for Fuse Replacement
The good news is that replacing a fan plug fuse typically requires only a couple of basic tools:
- Small Flathead Screwdriver: This is essential for opening most plug covers or the entire plug housing. A small 2.5mm screwdriver is often ideal for accessing the fuse compartment.
- New Fuse of the Correct Amperage and Type: The most important item! Ensure you have a replacement fuse that matches the specifications of the blown one.
- (Optional) Tweezers: For very small or fiddly fuses, tweezers can help with gentle removal and insertion.
Step-by-Step Guide: Replacing Your Fan Plug Fuse
With safety precautions in mind and your tools ready, follow these straightforward steps to replace the blown fuse:
Step 1: Disconnect and Access the Fuse
|
Our Picks for the Best Electric fan in 2026
As an Amazon Associate I earn from qualifying purchases.
|
||
| Num | Product | Action |
|---|---|---|
| 1 | Viniper Portable Rechargeable Fan, Small Desk Fan : 3 Speeds & about 8-24 Hours Longer Working, 180 Rotation, Portable Desktop Fan Small but Mighty, Strong Wind (White, Light Black Blade)6.2 Inch |

|
| 2 | Amazon Basics 16" Pedestal Fan with Remote, Floor Fan, Standing Fan for Bedroom, Living Room, Office, with 3 Speeds, 3 Modes, Timer, Dual-Layered Blades, Adjustable Height, Tilt Head, 60W, Black |
|
| 3 | LEVOIT Tower Fan for Bedroom, 25ft/s Velocity Standing Fan with 28dB Quiet for Sleep, Remoter, 12H Timer, 5 Speeds, 4 Modes, 90° Oscillation for Home, Office, Indoor, Bladeless 36 inch, White |
|
| 4 | Dreo Fan for Bedroom, 120° Oscillating Standing Fan, Quiet Floor Fan with DC Motor, Pedestal Fan for Room, 9 Speeds, 4 modes, 20dB, 120° Manual Vertical, 37-42" Adjustable Height, 9H Timer, Black |
|
| 5 | Dreo Tower Fan for Bedroom, 25ft/s Velocity Quiet Floor Fan, 90° Oscillating Fans for Indoors with 4 Speeds, 4 Modes, 8H Timer, Standing Fans, Bladeless Fan, Black, Nomad One (DR-HTF007) |
|
| 6 | XPOWER FC-100S Multipurpose 11 Pro Air Circulator Utility Fan with Oscillating Feature |
|
| 7 | Amazon Basics Air Circulator Fan, Desk Fan for Bedroom, Home and Office, With 90-Degree Tilt Head, 3 Speed Settings, Lightweight (3 LBS), 35 Watts, Black, 11.1"W x 6.3"D x 10.9"H |
|
| 8 | 10" Modern Standing Fan for Bedroom, Sleek Oscillating Pedestal Fan, 3-Speed & Height Adjustable Compact Floor Fan for Home Office & Dorm |
|
| 9 | Dreo Fan for Bedroom, 120° Oscillating Standing Fans, Quiet Floor Fan with DC Motor, 100ft Pedestal Fans for Room, 9 Speeds, 4 modes, 20dB, 120° Manual Vertical, 37-42" Adjustable Height, 9H Timer |
|
| 10 | Lasko 2520 Oscillating Stand Fan,White 16 Inch |
|
First and foremost, unplug the fan’s power cord from the electrical outlet. Next, locate the fuse compartment on the plug. Some plugs have a small, separate fuse cover that can be gently popped off with a flathead screwdriver. Others require you to unscrew and remove the entire plug cover by loosening a central screw on the face of the plug.
Step 2: Remove the Old Fuse
Once the compartment is open, you’ll see the old fuse, usually clamped between two metal holders. Carefully lift or pry it out using your small flathead screwdriver. Inspect the old fuse: a blown fuse will often have a visible break in the wire filament inside or may appear blackened or cloudy.
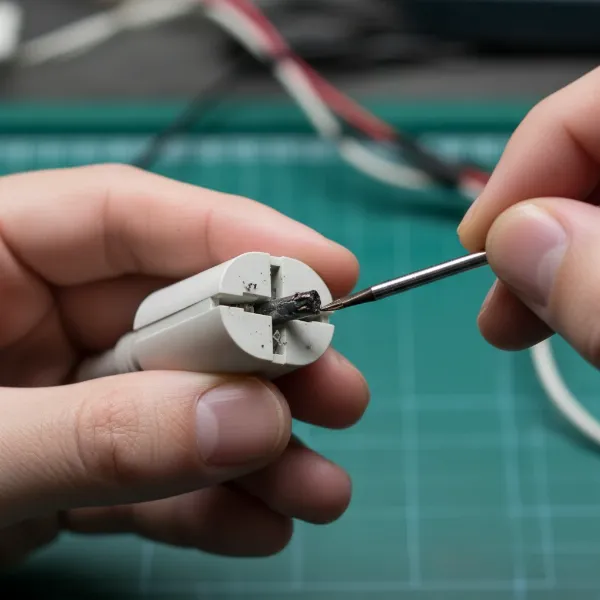 Close-up of hands using a small screwdriver to remove a blown fuse from a fan plug.
Step 3: Identify the Correct Replacement Fuse
This is a critical step. The fuse’s amperage rating is usually printed on one of its metal end caps or on the glass barrel. For most electric fans, common fuse ratings are 2.5 Amps, 3 Amps, or 5 Amps. It’s imperative to use a fuse with the identical amperage rating as the original. While a slight increase (e.g., from 2.5A to 3A) might be deemed acceptable in very specific scenarios, especially concerning UL listing compliance for certain fan types to prevent nuisance blowing under specific conditions (like cold copper windings), for general safety and adherence to manufacturer specifications, always aim to match the original rating precisely. Using a higher amperage fuse than specified can bypass the safety mechanism and pose a fire hazard.
Step 4: Insert the New Fuse
With the correct replacement fuse in hand, carefully insert it into the metal clips or holders in the plug. Ensure it sits firmly and makes good contact with both terminals.
Step 5: Reassemble and Test
Once the new fuse is securely in place, reattach the fuse cover or reassemble the plug by screwing its cover back on. Make sure all parts are snug and secure. Finally, plug your fan back into the electrical outlet and switch it on to test if it’s working properly. If the fan now operates, congratulations – you’ve successfully replaced the fuse!
What to Do If the Fuse Keeps Blowing
If you replace the fuse, and it blows again immediately or shortly after, this indicates a more significant underlying issue that a simple fuse replacement cannot resolve.
- Stop Using the Fan: Do not continue to replace fuses, as this signals a persistent electrical problem.
- Check for Obvious Faults: Look for any physical obstructions that might be preventing the fan blades from turning freely, listen for unusual noises from the motor, or check for tangled cords.
- Internal Problem: Persistent fuse blowing often points to an internal fault within the fan’s motor, wiring, or other electrical components. In such cases, the fan may require professional repair or replacement. Attempting to fix complex internal electrical issues without expertise can be dangerous.
Where to Buy Replacement Fuses
Finding the right replacement fuse is generally straightforward:
- Hardware Stores: Most hardware stores carry a selection of common appliance fuses.
- Auto Parts Stores: These stores are often an excellent resource for a wide variety of small appliance-sized fuses, as cars use many different types for sensitive electronic components.
- Online Retailers: Websites like Amazon or specialized electronics suppliers offer a vast selection of fuses, often in multi-packs, making it easy to find specific amperages. When purchasing online, ensure you verify the voltage rating and physical dimensions in addition to the amperage.
Buying Guide: Choosing the Right Fuse
When selecting a replacement fuse, keep these key factors in mind:
Match Amperage
This is the most crucial specification. Always choose a fuse with the exact same amperage as the original. This ensures the fuse blows at the intended current level, protecting your appliance from damage and preventing fire hazards.
Physical Size
Fuses come in various lengths and diameters. Bring the old fuse with you (if possible) or carefully measure it to ensure your replacement fuse fits perfectly into the plug’s compartment.
Voltage Rating
The new fuse’s voltage rating should be equal to or higher than the operating voltage of your fan (e.g., 125V or 250V). This indicates the maximum voltage the fuse can safely interrupt.
“A fuse isn’t just a simple wire; it’s a precisely engineered safety device. Matching its specifications, especially the amperage, is non-negotiable for the safe operation of your appliance.” – Dr. Eleanor Vance, Electrical Engineering Consultant
Conclusion
Replacing a blown fuse in your Electric Fan plug is a common and relatively simple repair that anyone can perform with a few basic tools and a strong emphasis on safety. By following these steps – unplugging the fan, carefully accessing the fuse, matching the amperage, and reassembling correctly – you can often revive a seemingly defunct fan and restore comfort to your home. Remember, the fuse is there for your protection, so always respect its role and never compromise on using the correct replacement. What other small appliance repairs have you successfully tackled to keep them running smoothly?
Frequently Asked Questions
Why do electric fan fuses blow?
Fan fuses typically blow due to an overload of electrical current, often caused by the fan motor drawing too much power, a short circuit within the appliance, or connecting too many devices to a single power outlet. It’s a safety mechanism to prevent damage and potential fire.
Can I use a higher amp fuse in my fan plug?
No, you should never use a higher amperage fuse than what is specified for your fan. A higher-rated fuse would allow excessive current to flow, which could damage the fan’s motor, overheat its wiring, and significantly increase the risk of an electrical fire. Always match the original fuse’s amperage.
How do I know if a fan fuse is blown?
A common sign of a blown fuse is if your fan suddenly stops working and receives no power. To confirm, visually inspect the fuse after removing it from the plug; a blown fuse often has a visible break in its internal wire filament or may appear blackened or discolored inside the glass casing.
What tools are needed to replace a fan fuse?
To replace a fan fuse, you typically only need a small flathead screwdriver to open the plug cover and a new fuse of the correct amperage rating. For very small fuses, tweezers can also be helpful for gentle handling.