Is your Lasko fan gathering dust, slowing down, or not moving air as effectively as it once did? A thorough deep clean can restore its power, quiet its operation, and extend its lifespan. Over time, dust and debris accumulate on fan blades, grills, and even inside the motor housing, hindering airflow and forcing the motor to work harder. This guide will walk you through the process of disassembling your Lasko fan for a comprehensive cleaning, ensuring it performs like new.
Electric Fans: An Overview and Common Types
Electric fans are essential appliances for cooling and air circulation, offering a refreshing breeze without the complexity of air conditioning. Their history traces back to the late 19th century, evolving from basic motor-driven blades to sophisticated smart devices. Lasko, a prominent manufacturer, offers a wide range of fans designed to meet various household and commercial needs.
Fans are generally classified by their design and how they operate:
- Box Fans: Simple, rectangular fans known for moving a large volume of air. They are often placed in windows to draw air in or out. Their enclosed design can sometimes make deep cleaning challenging without full disassembly.
- Pedestal Fans: These stand on a tall base, offering adjustable height and oscillation. They are popular for cooling larger areas and providing directed airflow. Their multiple components (base, pole, motor housing, head) require systematic disassembly.
- Table Fans: Compact versions of pedestal fans, designed for desks or small surfaces. They are usually easier to disassemble due to their smaller size.
- Tower Fans: Slim, vertical fans that provide oscillating airflow from a narrow grill. While space-saving, their internal mechanisms and intricate grills can make deep cleaning more involved, often requiring a different approach to access blades.
- Floor Fans/Circulators (e.g., Lasko Cyclone, Wind Machine): Powerful fans designed to circulate air throughout a room. These often feature robust housing and strong blades, requiring careful handling during disassembly.
Each type has its unique advantages and a specific method for disassembly, though many core steps remain consistent. Understanding your fan’s model can help identify if it uses screws, clips, or twist-off components.
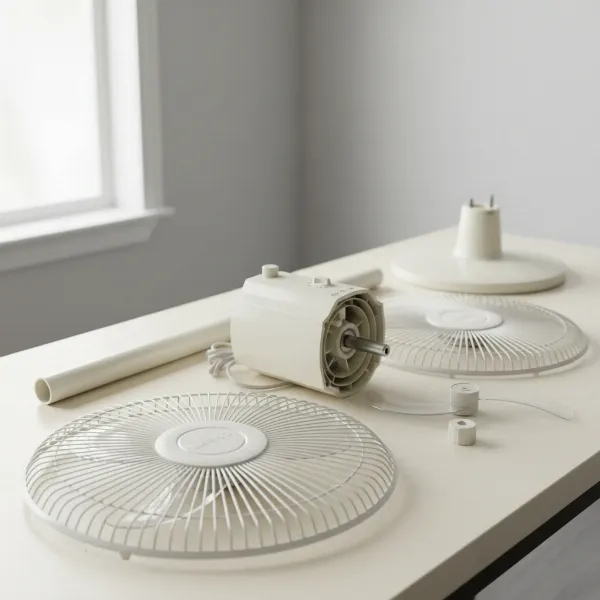 Lasko fan components disassembled, showing front grill, fan blade, rear grill, and motor housing.
Guide to Deep Cleaning Your Lasko Fan
A deep clean not only improves airflow but also helps maintain indoor air quality by removing accumulated dust, pet dander, and allergens. Before you begin, gather your tools and prepare a clear, flat workspace.
What You’ll Need
- Soft cloths (lint-free)
- Mild dish soap or all-purpose cleaner
- Warm water
- Screwdriver set (Phillips head is most common, but Torx may be needed for some models)
- Soft brush or old toothbrush
- Vacuum cleaner with brush attachment
- Compressed air (optional, for hard-to-reach areas)
- Safety glasses (optional, for dust)
|
Our Picks for the Best Electric fan in 2026
As an Amazon Associate I earn from qualifying purchases.
|
||
| Num | Product | Action |
|---|---|---|
| 1 | Lasko 2520 Oscillating Stand Fan,White 16 Inch |

|
| 2 | LEVOIT Tower Fan for Bedroom, 25ft/s Velocity Standing Fan with 28dB Quiet for Sleep, Remoter, 12H Timer, 5 Speeds, 4 Modes, 90° Oscillation for Home, Office, Indoor, Bladeless 36 inch, White |
|
| 3 | Dreo Fan for Bedroom, 120° Oscillating Standing Fan, Quiet Floor Fan with DC Motor, Pedestal Fan for Room, 9 Speeds, 4 modes, 20dB, 120° Manual Vertical, 37-42" Adjustable Height, 9H Timer, Black |
|
| 4 | Dreo Fan for Bedroom, 120° Oscillating Standing Fans, Quiet Floor Fan with DC Motor, 100ft Pedestal Fans for Room, 9 Speeds, 4 modes, 20dB, 120° Manual Vertical, 37-42" Adjustable Height, 9H Timer |
|
| 5 | XPOWER FC-100S Multipurpose 11 Pro Air Circulator Utility Fan with Oscillating Feature |
|
| 6 | Viniper Portable Rechargeable Fan, Small Desk Fan : 3 Speeds & about 8-24 Hours Longer Working, 180 Rotation, Portable Desktop Fan Small but Mighty, Strong Wind (White, Light Black Blade)6.2 Inch |
|
| 7 | 10" Modern Standing Fan for Bedroom, Sleek Oscillating Pedestal Fan, 3-Speed & Height Adjustable Compact Floor Fan for Home Office & Dorm |
|
| 8 | Amazon Basics 16" Pedestal Fan with Remote, Floor Fan, Standing Fan for Bedroom, Living Room, Office, with 3 Speeds, 3 Modes, Timer, Dual-Layered Blades, Adjustable Height, Tilt Head, 60W, Black |
|
| 9 | Dreo Tower Fan for Bedroom, 25ft/s Velocity Quiet Floor Fan, 90° Oscillating Fans for Indoors with 4 Speeds, 4 Modes, 8H Timer, Standing Fans, Bladeless Fan, Black, Nomad One (DR-HTF007) |
|
| 10 | Amazon Basics Air Circulator Fan, Desk Fan for Bedroom, Home and Office, With 90-Degree Tilt Head, 3 Speed Settings, Lightweight (3 LBS), 35 Watts, Black, 11.1"W x 6.3"D x 10.9"H |
|
Step-by-Step Disassembly and Cleaning
1. Safety First: Unplug Your Fan
Absolutely crucial: Always ensure your fan is completely unplugged from the power outlet before attempting any disassembly or cleaning. This prevents accidental startup and reduces the risk of electrical shock.
2. Remove the Front Grill
Most Lasko fans feature a front grill that protects the blades.
- For Screw-Secured Grills: Locate the screws (often small Phillips head) around the perimeter of the grill or on the fan’s housing. Carefully remove them and set them aside in a safe place.
- For Clip-Secured Grills: Many fans use small plastic clips around the edge. Gently pry these open or unlatch them. Some grills may also have a single locking screw at the bottom. Once all fasteners are released, carefully pull the front grill straight off.
3. Remove the Fan Blade
The blade assembly is typically secured to the motor shaft in one of a few ways:
- Nut/Cap: Look for a plastic nut or cap in the center of the blade, often labeled “TIGHTEN” and “LOOSEN” with arrows. Note that for fans, “TIGHTEN” might mean turning clockwise, and “LOOSEN” counter-clockwise, or vice-versa, so follow the arrows printed on the cap. Twist it off.
- Pull-Off Blade: Some Lasko blades simply slide straight off the motor shaft once the retaining nut is removed. Grip the blade firmly near the center and pull it straight towards you. Avoid twisting or bending the blades. For Lasko Wind Machine models, you might need to hold the motor with one hand and pull the blade off with the other.
- Set Screw: Less common, but some blades are secured with a small set screw on the hub that tightens onto the motor shaft. Loosen this screw with an appropriate screwdriver.
Once removed, carefully place the fan blade aside.
4. Remove the Rear Grill/Motor Housing Cover (If Applicable)
With the blade removed, you’ll often expose the rear grill and the motor housing.
- Rear Grill: This is usually secured by several screws (often Phillips head) around its perimeter, or it might be part of a larger back casing. Remove these screws and carefully detach the rear grill.
- Motor Housing: For a truly deep clean, or if you need to access the motor for lubrication (rarely necessary for cleaning alone and often not recommended by manufacturers), you might need to remove screws that secure the motor housing itself to the stand or frame. Be extremely cautious when working near the motor to avoid damaging wires or internal components.
5. Clean All Components
Now that the fan is disassembled, you can clean each part thoroughly.
- Grills and Blades: These are often the dirtiest parts.
- Fill a basin or sink with warm water and a few drops of mild dish soap.
- Submerge the plastic grills and blades.
- Use a soft cloth or an old toothbrush to scrub away caked-on dust and grime. For stubborn spots, a gentle all-purpose cleaner can be used.
- Rinse thoroughly under clean water.
- For heavily soiled parts: Some users find success cleaning large plastic parts in a shower with warm water and mild detergent, then letting them soak briefly before scrubbing.
- Crucial Step: Allow all parts to air dry completely before reassembly. Even a small amount of moisture can lead to rust or electrical hazards.
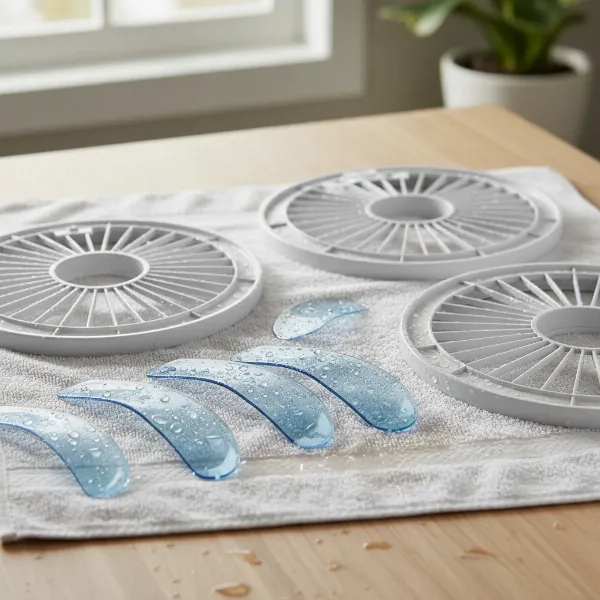 Cleaned Lasko fan parts, including blades and grills, air drying on a towel.
- Motor and Internal Housing:
- Use a vacuum cleaner with a brush attachment to remove loose dust from the motor housing and any exposed internal areas.
- For tight spots, compressed air can effectively blast away accumulated dust from vents and crevices. Always direct compressed air away from your face and other people.
- Use a soft, dry cloth to wipe down the exterior of the motor and any other internal plastic surfaces.
- Avoid getting any liquid directly on the motor, wiring, or electrical components.
6. Lubricate (Advanced – If Needed for Specific Models)
For some older Lasko box fans or models experiencing squeaking, lubricating the motor bearings might be beneficial.
- Warning: This is an advanced step and typically not necessary for routine cleaning. Consult your fan’s manual or a specific guide for your model.
- If lubrication is required, use 3-in-1 oil specifically designed for electric motors. Apply only a tiny drop to the motor shaft where it enters the bearings. Do NOT use WD-40, as it is a degreaser and not a lubricant suitable for fan motors.
7. Reassemble Your Fan
Reassemble the fan by reversing the disassembly steps.
- Ensure all parts are completely dry.
- Carefully align the rear grill, securing it with screws if applicable.
- Slide the fan blade onto the motor shaft, ensuring any flat sides or keyways align correctly. Tighten the retaining nut/cap as indicated (often counter-clockwise for Lasko fans).
- Align the front grill and secure it with its screws or clips. Make sure all clips are latched and screws are tightened snugly but not overtightened to avoid cracking plastic.
- Double-check that all components are securely in place and nothing is loose or rattling.
Where to Buy Reliable Electric Fans
When it’s time to purchase a new electric fan or replace an old one, choosing a reputable retailer is key to ensuring product quality, warranty support, and reliable performance.
- Major Electronics Stores: Retailers like Best Buy, Target, and Walmart often carry a wide selection of Lasko fans, from basic box fans to more advanced tower models. They provide the advantage of seeing models in person and often offer competitive pricing and return policies.
- Online Retailers: Amazon, Lasko’s official website, and other large e-commerce platforms offer a vast array of models, often with customer reviews and detailed specifications. Ensure you buy from authorized sellers to guarantee warranty validity.
- Home Improvement Stores: Stores such as Home Depot or Lowe’s also stock a variety of fans, especially larger pedestal or industrial-style fans.
When buying, always check the product’s warranty, read recent customer reviews, and ensure the retailer has a clear return policy.
Buying Guide: Choosing the Right Lasko Fan
Selecting the perfect Lasko fan involves considering your specific needs and environment.
What is your budget?
Lasko fans are available at various price points. Basic box or table fans can be quite affordable, while more advanced oscillating pedestal fans or tower fans with smart features will be at a higher price. Determine how much you’re willing to spend, keeping in mind that a slightly higher investment can sometimes mean better durability and more features.
How large is your room?
The size of your room directly influences the type and power of fan you need.
- Small rooms (under 150 sq ft): A compact table fan or a small tower fan might suffice.
- Medium rooms (150-300 sq ft): A pedestal fan, a medium-sized box fan, or a larger tower fan would be more effective.
- Large rooms (over 300 sq ft): Consider powerful floor fans (like the Lasko Cyclone or Wind Machine) or multiple pedestal fans to ensure adequate air circulation.
What features do you need?
Modern fans come with a variety of features that enhance convenience and comfort.
- Oscillation: Allows the fan head to sweep from side to side, distributing air over a wider area. Essential for cooling multiple people or a larger space.
- Remote Control: Offers convenience, allowing you to adjust settings from across the room.
- Timer: Useful for setting the fan to turn off automatically after a certain period, saving energy, especially overnight.
- Multiple Speed Settings: Provides flexibility to choose between a gentle breeze and powerful airflow.
- Quiet Operation: Look for fans specifically advertised as “quiet” or with low decibel ratings, especially if you plan to use it in a bedroom or office.
- Smart Features: Some newer models integrate with smart home systems, allowing voice control or app-based adjustments.
Considering these factors will help you narrow down your choices and find a Lasko fan that perfectly matches your requirements.
The simple act of deep cleaning your Lasko fan can dramatically improve its performance, making your living or working space more comfortable and reducing energy consumption. By following these steps, you not only restore your fan to its peak condition but also extend its life and ensure a fresh, consistent breeze for seasons to come.
Frequently Asked Questions
How often should I deep clean my Lasko fan?
The frequency depends on usage and environment. For daily use, especially in dusty homes or with pets, a deep clean every 2-3 months is recommended. For occasional use, once or twice a year should suffice to prevent significant dust buildup.
Can I put Lasko fan parts in the dishwasher?
It is generally not recommended to put Lasko fan parts in a dishwasher. The high heat and harsh detergents can warp plastic components or cause discoloration. Hand washing with mild soap and water is the safest and most effective method.
My Lasko fan is making a strange noise after cleaning. What should I do?
A strange noise usually indicates that something is loose or not properly aligned. Re-check all screws and clips during reassembly. Ensure the fan blade is securely attached to the motor shaft and that it spins freely without rubbing against the grills. Sometimes, a slightly bent blade or an unbalanced reassembly can cause vibrations.
How do I clean the motor without getting it wet?
To clean the motor, always use dry methods. A vacuum cleaner with a brush attachment is effective for removing surface dust. For accumulated dust in crevices, compressed air is ideal. Never use water or liquid cleaners directly on the motor or electrical components to avoid damage and electrical hazards.
Can I clean my Lasko tower fan using these steps?
While the general principle of unplugging and cleaning individual components applies, Lasko tower fans have a different internal structure than traditional blade fans. Disassembly for deep cleaning can be more complex and may involve removing the entire outer casing to access the internal squirrel cage fan. Always refer to your specific tower fan’s manual or a guide tailored for tower fans if available.