Is your once vibrant plastic fan now looking dull, discolored, or just plain tired? Don’t rush to replace it! With a bit of paint and some elbow grease, you can transform an old plastic fan into a stylish, like-new appliance that perfectly complements your decor. This guide will walk you through everything you need to know, from selecting the right materials to applying the perfect finish, ensuring your revitalized fan looks fantastic and performs flawlessly.
Why Paint Your Old Plastic Fan?
Painting an old plastic fan is more than just a DIY project; it’s a smart way to breathe new life into an essential household item. Instead of contributing to landfill waste, you can achieve a fresh aesthetic without the expense of buying a new unit. Whether it’s a humble desk fan, a towering pedestal model, or even a smaller personal fan, a coat of paint offers cost-effective personalization, allowing you to match it to a room’s color scheme or simply refresh its appearance. This simple upgrade not only extends the life of your fan but also adds a unique touch to your living space, turning a utilitarian object into a decorative accent.
Essential Materials and Tools for Fan Painting
Before diving into the painting process, gathering the right materials and tools is crucial for a smooth and successful project. Proper preparation and product selection will ensure your fan’s new finish is durable and looks professional.
Selecting the Right Paint
The key to painting plastic is choosing products designed for adhesion to such surfaces. Spray paint is generally the preferred method for its even coverage and smooth finish.
- All-in-One Spray Paint: Many brands offer “paint and primer in one” formulas specifically for plastic, wood, and metal. Products like Rust-Oleum Universal Metallic Paint & Primer In One or Krylon Fusion All-In-One are excellent choices as they simplify the process by combining two steps. These products often eliminate the need for a separate primer, saving you time and effort.
- Enamel-Based Spray Paint: If you opt for separate primer and paint, an enamel-based spray paint offers good durability and a hard finish, ideal for high-wear items like fans.
- Plastic-Specific Primer: For optimal adhesion and to prevent peeling or chipping, especially with regular spray paint, a primer formulated for plastic is essential.
- Finishes:
- Matte or Flat: Offers a non-reflective, modern look. It tends to hide minor imperfections.
- Semi-Gloss: Provides a subtle sheen and is easier to clean than flat finishes.
- Gloss: Creates a shiny, reflective surface. While appealing, some sources suggest avoiding it for ceiling fans as it can cause glare. For other fan types, it can offer a vibrant, new look.
- Chalk Paint: Can be used for a unique, milky smooth finish, but might be less durable for high-contact or moving parts without a topcoat.
|
Our Picks for the Best Electric fan in 2026
As an Amazon Associate I earn from qualifying purchases.
|
||
| Num | Product | Action |
|---|---|---|
| 1 | Lasko 2520 Oscillating Stand Fan,White 16 Inch |

|
| 2 | XPOWER FC-100S Multipurpose 11 Pro Air Circulator Utility Fan with Oscillating Feature |
|
| 3 | Amazon Basics Air Circulator Fan, Desk Fan for Bedroom, Home and Office, With 90-Degree Tilt Head, 3 Speed Settings, Lightweight (3 LBS), 35 Watts, Black, 11.1"W x 6.3"D x 10.9"H |
|
| 4 | Dreo Tower Fan for Bedroom, 25ft/s Velocity Quiet Floor Fan, 90° Oscillating Fans for Indoors with 4 Speeds, 4 Modes, 8H Timer, Standing Fans, Bladeless Fan, Black, Nomad One (DR-HTF007) |
|
| 5 | LEVOIT Tower Fan for Bedroom, 25ft/s Velocity Standing Fan with 28dB Quiet for Sleep, Remoter, 12H Timer, 5 Speeds, 4 Modes, 90° Oscillation for Home, Office, Indoor, Bladeless 36 inch, White |
|
| 6 | Dreo Fan for Bedroom, 120° Oscillating Standing Fan, Quiet Floor Fan with DC Motor, Pedestal Fan for Room, 9 Speeds, 4 modes, 20dB, 120° Manual Vertical, 37-42" Adjustable Height, 9H Timer, Black |
|
| 7 | Amazon Basics 16" Pedestal Fan with Remote, Floor Fan, Standing Fan for Bedroom, Living Room, Office, with 3 Speeds, 3 Modes, Timer, Dual-Layered Blades, Adjustable Height, Tilt Head, 60W, Black |
|
| 8 | Dreo Fan for Bedroom, 120° Oscillating Standing Fans, Quiet Floor Fan with DC Motor, 100ft Pedestal Fans for Room, 9 Speeds, 4 modes, 20dB, 120° Manual Vertical, 37-42" Adjustable Height, 9H Timer |
|
| 9 | Viniper Portable Rechargeable Fan, Small Desk Fan : 3 Speeds & about 8-24 Hours Longer Working, 180 Rotation, Portable Desktop Fan Small but Mighty, Strong Wind (White, Light Black Blade)6.2 Inch |
|
| 10 | 10" Modern Standing Fan for Bedroom, Sleek Oscillating Pedestal Fan, 3-Speed & Height Adjustable Compact Floor Fan for Home Office & Dorm |
|
Gathering Your Toolkit
Having all your tools ready before you start will make the process much more efficient.
- Screwdrivers: For disassembling the fan.
- Sandpaper: Fine-grit (100-220 grit) for light sanding and scuffing.
- Cleaning Agents: Mild dish soap and warm water, mineral spirits or rubbing alcohol, and an all-purpose cleaner (especially for outdoor fans or those with mildew).
- Rags/Microfiber Cloths: For cleaning and wiping surfaces.
- Painter’s Tape: To mask off any areas you don’t want painted (e.g., motor, electrical components, brand logos).
- Drop Cloths or Newspaper: To protect your work area from overspray.
- Gloves: To protect your hands from paint.
- Respirator Mask: Essential for ventilation and to protect against paint fumes, especially when spray painting.
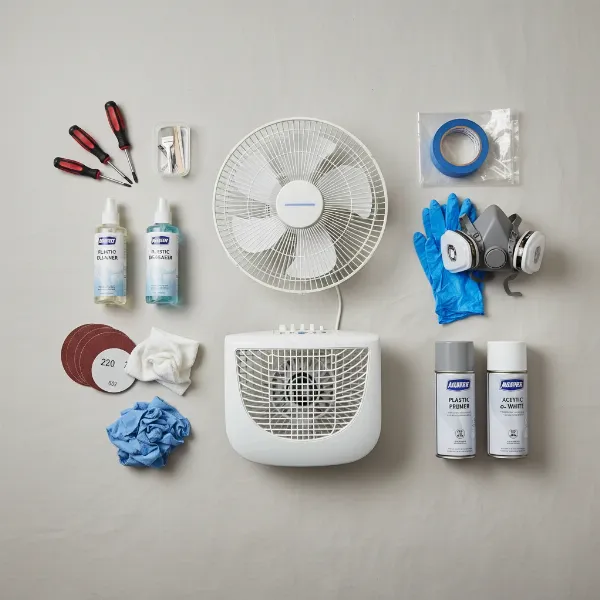 essential tools and materials for plastic fan painting project setup
Step-by-Step Guide: Giving Your Plastic Fan a Fresh Look
Transforming your old plastic fan into a showroom-worthy piece requires careful attention to detail at each stage. This detailed guide ensures a lasting and aesthetically pleasing finish.
Disassembly and Initial Cleaning
Safety and thoroughness are paramount in these initial steps. Always begin by unplugging your fan to prevent any electrical hazards.
First, carefully disassemble your fan. Most plastic fans can be taken apart with a screwdriver or by unhinging clips. Separate the fan blades, guard, motor housing, and any other removable components. This allows for comprehensive cleaning and painting of each piece. Next, clean all parts thoroughly. Use warm water and mild dish soap to remove dirt, dust, and grime. For stubborn residue, grease, or if the fan was used outdoors, a degreaser, mineral spirits, or an all-purpose cleaner can be effective. Ensure there’s no leftover debris, then rinse thoroughly and allow all components to air dry completely.
Preparing the Surface for Optimal Adhesion
Proper surface preparation is the most critical step for achieving a durable paint job that won’t peel or chip.
Once clean and dry, lightly sand all plastic surfaces you intend to paint. Use fine-grit sandpaper (100-220 grit) or a Scotch-Brite pad to gently scuff the surface, creating a dull finish. This provides the necessary texture for the paint to adhere effectively. Be careful not to sand too aggressively, as excessive heat can damage the plastic. After sanding, use a dry brush or a tack cloth to remove any sanding dust, followed by a final wipe-down with a damp cloth or rubbing alcohol to ensure the surface is pristine. Let it dry completely. Finally, use painter’s tape to meticulously mask off any areas you wish to protect from paint, such as the fan’s motor, electrical cords, and internal mechanisms. This prevents damage and ensures only the intended parts receive paint.
Priming and Painting Techniques
With your fan disassembled and prepped, it’s time to bring on the color. Proper application is key to an even, professional-looking finish.
If you’re using a separate primer, apply one thin, even coat of plastic-specific primer. Follow the manufacturer’s instructions for drying time. Once the primer is dry, or if you’re using a “paint and primer in one” product, you’re ready to paint. Shake the spray paint can vigorously for at least one minute before use and periodically during application. Always test the spray nozzle on a piece of scrap cardboard to check the pressure and spray pattern. Hold the can 6 to 8 inches away from the surface and apply paint in light, even, sweeping motions. Avoid applying thick coats, as this can lead to drips, runs, and an uneven finish. Two to three thin coats are typically sufficient for full coverage. Applying too many heavy coats, especially on fan blades, can add excessive weight, potentially unbalancing the fan and causing it to shake when in use. Allow adequate drying time between each coat as per the product’s instructions, typically 15-30 minutes, before applying the next.
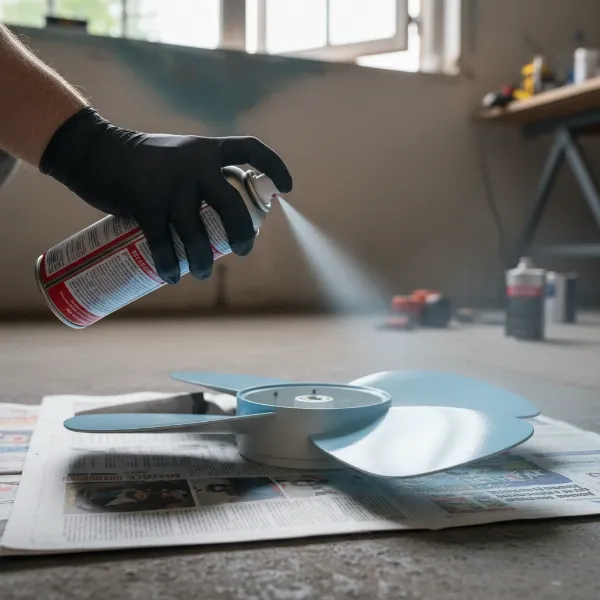 person applying spray paint to a plastic fan blade with even strokes
Reassembly and Final Touches
The final steps involve patiently allowing the paint to cure and then carefully reassembling your beautifully transformed fan.
Ensure all painted components are completely dry and cured before attempting reassembly. This may take 24-48 hours, or even longer, depending on the paint type, humidity, and temperature. Rushing this step can lead to smudges, fingerprints, or damage to the fresh paint. Once fully dry, carefully put all the fan parts back together, reversing the disassembly process. Double-check that all screws are tightened and clips are securely fastened. Plug in your newly painted fan, turn it on, and admire its revitalized appearance!
Maintenance Tips for Your Newly Painted Fan
To keep your newly painted plastic fan looking fresh for years to come, gentle maintenance is essential. Avoid using harsh chemical cleaners, as these can strip or dull the paint finish. Instead, opt for a soft, damp cloth with a mild soap solution for cleaning painted surfaces. Regular dusting with a microfiber cloth will prevent dirt and grime buildup, preserving the fan’s refreshed aesthetic and the integrity of your hard work.
Where to Find Quality Painting Supplies
Finding the right supplies is crucial for a successful fan painting project. You’ll generally find everything you need at several convenient locations. Local hardware stores and home improvement centers are excellent resources, offering a wide selection of spray paints, primers, sandpaper, and protective gear. Craft stores also carry various spray paint colors and finishes, sometimes including specialty paints. For even greater selection and competitive pricing, online retailers are a fantastic option, allowing you to compare products and read reviews from other DIY enthusiasts. When purchasing, always check product labels to ensure compatibility with plastic surfaces and read user reviews for insights into performance and durability.
Conclusion
Painting an old plastic fan is a rewarding project that combines sustainability with personalization. By following these steps—from thorough cleaning and careful sanding to choosing the right paint and applying it with precision—you can easily transform a tired, overlooked appliance into a vibrant, like-new addition to your home. It’s a testament to how a little effort can go a long way in refreshing your living space and extending the life of your belongings. What color will you choose to bring your old fan back to life?
Frequently Asked Questions
Do I need to prime plastic before painting?
It depends on the paint you use. If you choose a “paint and primer in one” spray product specifically formulated for plastic, you may not need a separate primer. However, for standard spray paints, applying a dedicated plastic primer is highly recommended to ensure proper adhesion and prevent chipping or peeling.
What kind of paint works best on plastic fans?
Spray paints, particularly enamel-based formulas or those labeled “paint and primer in one” that are suitable for plastic, generally work best. Brands like Rust-Oleum Universal or Krylon Fusion All-In-One are popular choices for their durability and adhesion to plastic surfaces.
How many coats of paint should I apply?
For best results, apply two to three thin, even coats of paint, allowing adequate drying time between each. Avoid applying a single thick coat, as this can lead to drips and an uneven finish. Applying too many heavy coats, especially on fan blades, can potentially unbalance the fan.
Will painting affect fan balance?
Applying too many thick coats of paint, particularly on the fan blades, can add significant weight and potentially unbalance the fan, leading to wobbling or inefficient operation. Stick to light, even coats to minimize this risk and maintain optimal performance.
How long does a painted plastic fan last?
With proper preparation, quality materials, and careful application, a painted plastic fan can maintain its fresh look for several years. Longevity also depends on usage, environmental conditions, and how gently it is cleaned.